Tuesday, June 26, 2018

Greens and Cheese Panini


I know it’s very unlikely that you need instructions for making a sandwich. Really all you need when it comes to sandwich recipes is an idea of what to stuff between bread or wrap up with a tortilla or whatever. This one, I’m going to tell you all about, however, for three reasons. First, it’s a great use of these Braised Greens with Bacon and Onion, or any other cooked greens flavored the way you like them. 2) While I didn’t make this recipe vegetarian this time around, you could very easily do so. I had originally made panini like this as an exploration in vegetarian sandwiches. And C. It’s really, really delicious this way and if you use this recipe as a guideline, I truly believe you’ll be heading in a wonderful direction in your sandwich-making life.

The instructions below are for one sandwich at a time, and can, of course be multiplied to fit your needs. All that happens here is some bacon and some cooked greens go on a sandwich roll, such as those little square-ish ciabatta rolls you can get at supermarkets. (I like the ones from Trader Joes.) Thin slices of your favorite cheese get in there, too, because this is a pressed and toasted sandwich, and gooey melting is required.

 
I also really love to spread one of the inside surfaces with a sweet-spicy relish of some sort. There are all kinds of them out there. You could also use a pepper jelly or dipping sauce, chutney, or, if you prefer things milder, some kind of caramelized onion/balsamic vinegar jam.

You could use any kind of bread here, too. If you use a crusty roll, you really don’t need to butter the outside of the bun. (Plus, it’s kind of hard to do.) If you use slices of bread, you may want to butter the outside so you can get a golden, toasty surface. The thinner your bread, the thinner the pressed sandwich, of course, which is why I like to use a crusty-ish roll or a thick slice of a heartier bread.


I use a panini press to make these sandwiches, but you could use a skillet on the stove and press your sandwich with some kind of weight, even another skillet. If you do things this way, you will need to flip your sandwich to get it toasted on both sides.

I love the flavors of this slightly weird sandwich. The greens, whether they are the Braised Greens with Bacon and Onion or some kale sautéed with lots of garlic make a delicious, surprisingly flavorful sandwich base. I used a Spanish Iberico cheese. Anything that you like that melts well will do, although I like something a little stronger. In my opinion, the sweet-spicy relish makes everything wonderful, popping through the earthy greens and gooey cheese. And then there’s bacon. Well, we all know about the Midas touch that has. This sandwich is perfectly wonderful without it, though. Don’t avoid a greens sandwich just because you avoid bacon. There’s way too much good going on for that kind of attitude.


Greens and Cheese Panini with Bacon

For each sandwich:
1 sandwich roll, split, or 2 slices sandwich bread
Softened butter for the bread if desired
¼ cup cooked greens, such as Braised Greens with Bacon and Onion, well-drained of excess liquid
1-2 thin slices well-melting cheese
1 ½ - 2 strips cooked bacon
2 teaspoons red pepper relish, or sweet-spicy sandwich spread of your choice

1. Preheat a panini press or a skillet on the stove to medium heat. If desired, spread butter on the outside of each bread slice or bun.

2. Place the cheese on the unbuttered side of one bread slice or the bottom bun half. Place the bacon on top of the cheese. Place the greens on top of the bacon

3. On the unbuttered side of the remaining bread slice or the top bun half, spread the red pepper relish. Place the top bun half on the greens.

4. Place the sandwich onto the preheated panini press or pan. Close the lid, press the sandwich and cook according to manufacturer’s instructions until the cheese is melted, the sandwich is heated through and the bread is toasted. If not using a press, place a weight or another pan on top of the sandwich in the heated pan. Flip the sandwich over and press to toast the other side.

Makes 1 sandwich. Multiply or repeat as needed to make more sandwiches.


Another recipe like this one:Tacos with Sauteed Greens and Fresh Cheese

Sunday, June 24, 2018

Featured Ingredient: Sugar Snap Peas


I remember standing with my grandpa in his huge garden while he told me about “Lazy Man Peas.” They were peas that you didn’t have to break out of their pods to enjoy. You could just munch away at them pod and all. Really, these peas are mostly tender, fleshy pod, with just tiny little peas inside. The pods are fatter than snow peas, which are usually very flat, and they are delicious. The varieties we are accustomed to getting our hands on today first were introduced to the general American gardening public in the 1970’s, and Grandpa was on the cutting edge, although peas with such substantial pods have been around for 300 years or more.

I’m not sure when I saw a Lazy Man pea pod again, although by then they were using their more popular name: Sugar Snap Peas. In the many years between my childhood experience and my current farmer’s market obsession, they came to be very popular and easily available in supermarkets, fresh or frozen. And I came to anticipate the local snap pea season like a kid does Christmas.

Sugar snap peas are a rather versatile vegetable, and are good cooked as well as raw. I like to pull their slightly unchewable ends and strings off (you can kind of snap the stem end down and unzip the strings from the spine and belly of the pod) and eat them like candy. They’re nice chopped up in a green salad or are good as part of a veggie tray with Garlic and Herb Vegetable Dip or Green Pea Hummus.


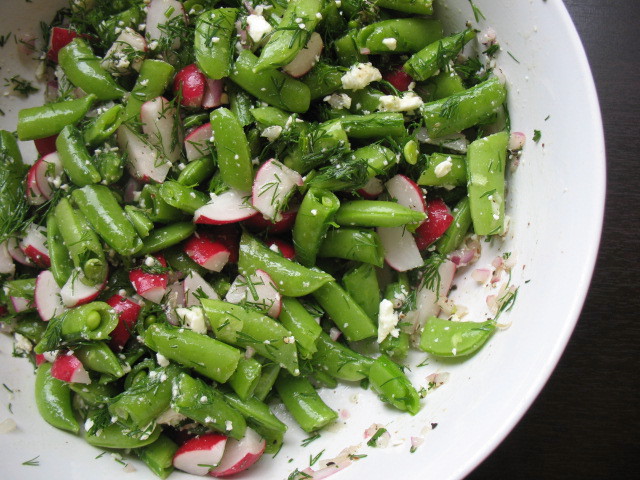
They’re great raw in just about all other kinds of salads, too. They keep their crunch and play well with other vegetables in salads like Sugar Snap Pea and Radish Salad with Feta and Dill


Thinly sliced, they’re a nice addition to slaw like Napa Cabbage Slaw with Asian Flavors.


They’re also great with green peas, split peas, and walnuts in this Three Pea Salad with Walnuts and Parmesan.


The naturally crunchy nature of sugar snap peas allows them to hold up well to grains in salads, too, like in this Wheat Berry Salad with Sugar Snap Peas and Lemon Vinaigrette or Black Rice Salad with Snap Peas and Avocado.


Of course, you can cook snap peas as well. I particularly like them sautéed or stir fried until just tender-crisp, as in simple pasta dishes like Pasta with Snap Peas, Sage, and Breadcrumbs


And you can add them to an early summer stir fry, like this one.


 And if you have enough snap peas to enjoy them fresh while waiting for Pickled Sugar Snap Peas to be properly infused with vinegar, ginger, garlic, and chiles, so much the better. They’re well worth waiting for.

I love delving through my recipe collection to find new ways to use my farmer’s market snap pea gatherings, but if I can’t decide on the best way to use them, I’m perfectly happy to eat them all out of hand. On their own, they’re one of my favorite garden vegetable treats (at least until cucumbers and tomatoes arrive). And if my feelings for them qualify as an obsession, it may be the most healthy obsession in the world. 

Consider inviting sugar snap peas into your life this summer. Or don’t. I’ll be happy to eat them all.


Coming soon: Greens and Cheese Panini


Sunday, June 17, 2018

Braised Greens with Bacon and Onion


Whether it’s because my tastes have changed in adulthood, or because I’ve found a way of serving sturdy, sometimes bitter summer greens that appeals to me, I’m now someone who gets excited about cooked leafy greens. There are so many ways to use them, and they’re abundant in the local farmer’s market right now. They may not need it, but I’ve also found that bacon really doesn’t hurt this kind of dish.

I usually cook kale from my garden this way, with much more thought about stuffing it into cheesy panini than about formulating a recipe. (More about that sandwich another time!) I also usually create more of a quick saute than a flavorful braise, but I wanted to make a bigger batch that I could use for several dishes as well as just eating it as a flavorful side dish.  

I didn’t want to wait for the kale to grow in my garden, so I got some lovely mustard greens and chard from the local farmer’s market to try this out. I started out with bacon, which wouldn’t be necessary if you don’t use it in your kitchen, but which really made for some flavorful greens. Plenty of onions and some garlic are good here, too, and work as well with the zesty mustard greens, as they would with milder greens.

I call this a braise because I added a small amount of liquid to my greens, onions, and bacon fat and let everything bubble away relatively slowly. While I only cooked my greens about 20-25 minutes, that’s way longer than a saute, even if it is far less time than it would take to braise a hunk of meat.

 
The flavor of the bacon and the onions really permeates these well-cooked greens. You can leave some of the liquid with them, or cook most of it off if you know you’re going to use the greens for something in which the liquid would be a problem. These greens can be served as they are, with the cooked bacon sprinkled over the top. They can go on a bed of rice to soak up the flavorful liquid, or a chunk of bread can do those honors. They can be stuffed into omelets or tortillas (like in this dish), or can be made into a frittata, quiche or other type of savory pie or tart. As I mentioned above, I love to make panini with cooked greens, melting cheese, and a smear of some kind of zesty condiment. With additional bacon, or with no bacon at all, it’s a great way to enjoy some healthy and delicious summer leaves.


Braised Greens with Bacon and Onion
You can use whatever leafy greens you like here, strong or mild in flavor, delicate or more robust in texture. Most recently, I used a combination of mustard greens and chard.

To make this dish vegan, omit the bacon and all the recipe steps that go with it. Substitute your favorite cooking oil for the bacon grease.


3 strips bacon, chopped
1 cup thinly sliced onion
2 medium-size cloves garlic, finely chopped
About 12 cups chopped greens, tough stems removed
½ teaspoon coarse salt, divided, plus more to taste
½ cup water or vegetable broth, plus more if needed

1. In a large pot, cook the bacon over medium heat, stirring often, until all of it is well-browned. Remove the bacon from the pot and set aside to drain on a paper towel. Reserve about 2 tablespoons bacon fat. (Pour off the rest.)

2. Add the onion and ¼ teaspoon salt to the hot fat and saute on medium heat for about 8 minutes, or until the onion is translucent and beginning to get soft. Add the garlic and cook, stirring, for about 1 minute more.

3. Add the greens, a little at a time, continuing to add the rest as they cook down. Stir frequently. Once all of the greens have been added to the pot, scatter on the remaining ¼ teaspoon salt. Add the water or broth and cover the pot. Reduce heat to medium-low and cook at a gentle boil until the greens and onions are very soft, about 15-20 minutes. Lift the lid to stir occasionally. Add more water if the greens are getting dry.

4. Remove the lid and continue to cook until there is just a small amount of liquid remaining, about 5-10 minutes more, or until the liquid level is to your taste. Taste for seasoning and add more salt if needed. Serve the greens with the bacon sprinkled on top. You can serve them in a bowl with a chunk of bread to soak up the flavorful liquid, or drain and use as a filling for a variety of dishes as desired.

Makes about 4 cups cooked greens.