Showing posts with label Recipe Revisit. Show all posts

Saturday, February 16, 2019

Recipe Revisit: Chickpea Stew with Apricots


This was one of those recipes that I made once, thought was wonderful, and then never made again. I couldn’t recall why this stew wasn’t something I wanted to make often, except, perhaps that it has a lot of parsnips in it, which I only tend to use in the deepest of winter, when there’s not such exciting produce to choose from. I did report having some trouble getting the chickpeas cooked properly using the method of the original recipe, so I sort of rearranged things to improve that.

For starters, I cooked the chickpeas first and separately. I think there was too much acid in the stew to cook the chickpeas along with everything else. That may have been what caused them to stay too firm, no matter how long I cooked the stew. This worked well, and also allowed the stew to be cooked in shifts, each taking a little less time than cooking everything all at once. (My schedule demands this!)

The rest of my adjustments involved streamlining the process, making it more like I make other soups and stews: sauteeing vegetables, stirring in spices, stewing the vegetables with the cooked beans, adding the final touches and seasonings, and adjusting the flavors to taste.


This recipe makes a big, big pot of stew, and could probably be halved. It also makes a subtly flavored stew, slightly sweet from all those parsnips with some fruity and floral notes from the apricots. It’s hearty and satisfying. It’s got a healthy nutritional profile with good doses of protein and fiber. It’s also vegan, if that happens to matter to you.

With its fairly mild flavor profile, this stew has plenty of room for other taste improvisations. The natural sweetness makes me think you could add cinnamon and allspice to the seasonings. Lots more spice, in the form of more chile, or curry powder or paste would be good. Other vegetables, such as bell peppers, could replace the parsnips in other seasons. Add some greens, like spinach or arugula.

Overall, this recipe revisit was a success. I made the necessary changes to make the process more approachable. I got more ideas on how to vary the flavors satisfactorily. And, most importantly, I made a big pot of comforting stew to warm us from the inside in this winter that will not end.


Chickpea Stew with Parsnips and Dried Apricots
If you start with cooked chickpeas, you will need 3 ½- 4 cups.

I think you could cut the recipe quantities in half would good results. You could also adjust the spices and seasonings to your personal taste.

If you get your chickpeas (or any dried beans) very fresh, you may not need to soak them before cooking. I usually have good results with a 6-8 hour soak.

12 ounces dried chickpeas
2 tablespoons olive oil
1 ½ cups chopped onion
1 cup chopped celery
2 cups chopped carrot, about ½ inch dice
2 cups chopped parsnip, about ½ inch dice
2 tablespoons tomato paste
1 tablespoon salt
1 tablespoon cumin
1 teaspoon dried oregano
¼ teaspoon crushed red pepper flakes
6 cups water
2 bay leaves
1 cup finely chopped dried apricots
2 tablespoons lemon juice
Chopped fresh parsley for serving

1. Rinse the dried chickpeas and sort out any debris or chickpeas that don’t look good. Place the chickpeas in a large pot or bowl. Cover with at least 2 inches of water. Let stand 6-8 hours.

2. Drain the soaking chickpeas. Return them to the pot and cover with a few inches of water. Bring to a boil, then reduce the heat. Cook the beans at a low boil until they are soft but not yet falling apart. This could take up to an hour, and can be done a day or two ahead. Drain the cooked chickpeas and set aside.

3. Heat the olive oil in a large (6 quart or larger) pot or Dutch oven over medium heat. Add the onion, celery, carrot and parsnip. Cook, stirring often for about 10 minutes, or until the onion appears softened and translucent.

4. Stir in the tomato paste, salt, cumin, oregano and crushed red pepper flakes. Cook about one minute, stirring frequently. Add the cooked chickpeas, bay leaves and water.

5. Bring to a boil. Reduce the heat and cover. Cook at a gentle boil until the vegetables are very tender, about 35-45 minutes.

6. Stir in the apricots and cook until they are soft. Stir in the lemon juice. Taste the stew for seasonings and adjust as desired, especially for salt and acid. Garnish each serving with chopped parsley.

Makes a big pot of stew, probably about 8 servings.


One year ago: Curry Carrot Soup

Friday, August 31, 2018

Recipe Revisit: Summer Squash Casserole


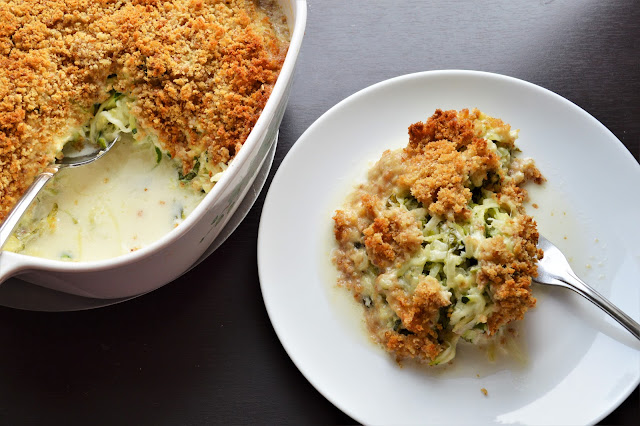
I’d like to say that I went back to this summer squash recipe in order to make it lighter, more virtuous, healthier. With a reduced cream to squash ratio, that may have been the end result, but the real reason I did what I did is that I had two large zucchini and the original recipe only called for the weight of one of them. Thus, a double-volume, but not double-calorie recipe came to be.

I published this recipe in its original form in the first few months that I was writing this blog. It needed an update, and I was just going to snap some new photos, tell you it was just fine made with all zucchini as well with a mixture of summer squashes, and move on to more zucchini recipes. 


That second squash, however, compelled me to plump up the casserole. I doubled the squash content, but I didn’t double the rest of the ingredients, with the exception of the onion. Instead, I only slightly increased the cream volume and left everything else the same.

The casserole is still delicious! In fact, I think it has a cleaner, greener taste now. The basil and onion are great flavors with the zucchini, and the cream and Parmesan are enhancers rather than dominators.


Another quantity I did increase in this recipe is the time the grated zucchini and onion spend draining. There’s a step in which the salted vegetables get a chance to release some moisture and I think this is an important step for keeping the casserole from being too watery and soggy. The greater volume of squash needed longer to properly drain than the time allowed in the original recipe, and I reflected that in the updated recipe below.

I may not have set out to create a more virtuous recipe, but I do really like this inadvertently lightened version of summer squash casserole. And at least I can say that the zucchini isn’t hidden like it is in the cake I put in the last post. Perhaps they can balance each other out in these zucchini-loaded days.


Summer Squash Casserole with Basil and Onion

2 pounds summer squash (zucchini, yellow crooked-neck, patty pan, or a mixture)
1 medium yellow onion
1 teaspoon coarse (kosher) salt
½ cup chopped fresh basil
½ cup grated Parmesan cheese
2 cloves minced garlic
1 cup heavy cream
1 cup fresh breadcrumbs
2 tablespoons butter

1. Grate the squash and onion using the shredding blade of a food processor or by hand with a box grater (largest holes).

2. Toss the grated squash and onion with the salt in a colander. Allow to stand and drain in the sink for 30-60 minutes.

3. Preheat the oven to 400 F. Spin the squash mixture dry in a salad spinner, or squeeze it out with a clean towel and pat dry. You want to get as much of the moisture out of the squash as you can without completely destroying it.

4. In a large bowl, mix the drained squash mixture with the basil, Parmesan and garlic. Grease a 2 quart casserole dish and pour the squash mixture in. Pour the heavy cream evenly over the squash mixture.

5. Melt the butter and toss the breadcrumbs with the melted butter until completely moistened. Spread the breadcrumb mixture evenly over the squash mixture.

6. Bake at 400F for 25-30 minutes or until the topping is well browned, the cream has been absorbed, and the casserole is bubbling.

Makes 4-6 main dish servings, or at least 8 side dish servings.


One year ago: Barley Flour Scones

Sunday, January 28, 2018

Recipe Revisit: Buttermilk Biscuits


This wonderful recipe for basic buttermilk biscuits, my interpretation of Harry’s grandmother’s southern recipe, is still just about the only biscuit recipe that matters to me. I recently made it into smaller biscuits to feed a crowd (a large enough crowd to make my house feel pretty “cozy”). They were presented as accompaniments to pots of hot soup on a frigid early January night, and it seemed that they were gone in seconds. Success!


But as I was baking them, I noticed that it was taking significantly longer to properly cook them than had been indicated in the recipe I posted years ago. I had apparently adjusted baking times as needed without really thinking about it, waiting to pull the biscuits out of the oven until I knew they were good and done. I can’t think of anything more annoying to a recipe reader than secret instructions. A quick re-visit was in order.


The concocting portion of the recipe needs no revision, although I do think that kneading the dough more deliberately, if still gently, makes it easier to work with when it comes to cutting out the biscuits. It does take more time for the biscuits to get to the desired just-beginning-to-brown stage than what is stated the original post (and possibly the original handed-down recipe. I can’t remember.) I simply increased that time in the instructions below. It’s still best, as always, to prepare to exercise your own judgement, a skill that is essential in the making of a good baker. The biscuits will be done when they are done, and oven temperatures can vary across households.

While this biscuit batch is for about twelve 2 ½ to 3-inch biscuits, you can use this recipe for more, smaller biscuits with good results. It’s likely that the baking time will be slightly shorter for smaller biscuits.


I still think there are ways this can be varied to include whole grains or more flavors, and I did do such a thing with this cinnamon raisin version. Southern-style white flour buttermilk biscuits are classic, however, and their charm would become more elusive with unnecessary changes or additions. As they are, they’re simple, quick to throw together, satisfying on their own with butter or jam or ham and cheese, and great accompaniments to so many things.


Grandmama’s Buttermilk Biscuits

3 cups all-purpose flour
½ teaspoon fine salt
5 teaspoons baking powder
¼ teaspoon baking soda
½ cup cold butter (1 stick)
1 ½ cups cultured buttermilk

1. Preheat oven to 450 F. In a large bowl, combine the flour, salt, baking powder and baking soda. Sift or whisk together to combine.

2. Cut the butter into small chunks. With a pastry blender, knives or your hands, cut or work the butter into the flour mixture until it is well-distributed and the butter pieces are smaller than peas and coated with flour. (I usually end up using my hands.)

3. Add the buttermilk and stir gently until all of the flour mixture is moistened. Add a little more buttermilk if the mixture is too dry.

4. Turn the dough out onto a well floured surface. Gently knead the dough a few times and shape it into a rough disk. Gently pat the disk out to about 1 inch thick, dusting the flour as needed to keep the dough from sticking. Cut the dough into about 12 biscuits with a round cutter or an inverted glass. (I used a 2 ½-inch biscuit cutter.) Place the cut biscuits on a baking sheet. (I line my baking sheet with a silicone baking mat.)

5. Bake at 450 F for 15-18 minutes or until just beginning to brown. Serve as soon as they are cool enough to eat. Leftovers are nice when warmed in the microwave. The biscuits also freeze well.

Makes about 1 dozen biscuits.