Monday, September 28, 2009

September Tomatoes

I always have an orderly rank of recipes lined up, eagerly waiting to volunteer their services to the tomatoes that come in July and August. I can hardly wait to make Gazpacho. I always hope the basil in the containers on my porch will be ready when the first cherry tomatoes are in the CSA box so I can make Pasta with Cherry Tomatoes, Olives and Basil. Sandwiches and salads benefit from that sweet-tart and juicy boost that can only come from ripe seasonal tomatoes. When it gets to September, however, I want something different. Even if it hasn’t started to get cold yet (for the record, it just did), the days are noticeably shorter, the breezes a little cooler, and warmer food somehow beckons more forcefully than cold soups.


When I got a gift of beautiful heirloom tomatoes from my friends Jen and Jake (I do believe Jen is the gardener) a little while back, I wanted to do something particularly nice with them. I knew I was probably going to make a sauce or salsa or something out of many of them, just because it would be hard for even me, a great lover of tomatoes, to just eat them all fresh, much as I wanted to.

After I’d been shopping for the week, I remembered this great recipe for a tomato and beef stir fry I had copied from a cookbook by Martin Yan way back when. In fact, the when was so way back that I had never made this dish for Harry, at least not that either of us could remember, and I’ve known him for 12 years. Luckily, I had just bought some steak for Harry, so I happened to have what I needed for the recipe. It was a New York strip steak, which is pretty fancy for stir fry. Normally, I would use flank steak, sirloin, or even round steak for stir frying, cutting it across the grain to ensure more tenderness in the final product (the shorter fibers result in easier, more pleasant chewing). I have to say, the strip steak was super tender in this dish, and since the recipe doesn’t use much beef, a more expensive cut is still reasonably economical. Use what you like or what you have.

I made a few other changes to the original recipe that also reflected what I happened to have in my pantry at the time, plus I increased the amount of tomatoes. For me, it was all about the tomatoes. The final dish had the consistency of a stew, and, if you didn’t feel like messing with rice or noodles, or if your cupboard was bare of such starches, you could serve this like a stew. I served it over brown rice, which soaked up the savory sauce. The complex flavors of the perfect heirloom tomatoes worked and played extremely well with the soy sauce and vinegar. Harry said the flavors oscillated on the tongue. I needn’t say more than that.


Tomato and Beef Stir Fry
Based on a recipe by Martin Yan

2 tablespoons soy sauce
2 tablespoons Shaoxing wine or dry sherry
2 tsp cornstarch
¾ lb beef steak, such as flank steak, sirloin, round steak (or whatever you like), thinly sliced across the grain
¼ cup ketchup
2 tablespoons soy sauce
2 tablespoons rice vinegar
1 tablespoon chile garlic sauce
1 teaspoon sesame oil
2 teaspoons sugar
2 tablespoons vegetable or peanut oil, divided
1 tablespoon minced garlic
1 small onion, chopped (about 1-inch pieces)
1 cup green bell pepper, chopped (about 1-inch pieces)
4 cups tomato cut into wedges (about 3 large tomatoes
2 teaspoons cornstarch
2 tablespoons water


1. Combine 2 tablespoons soy sauce, dry sherry and 2 tsp cornstarch in a medium bowl. Add the sliced steak and stir to coat evenly. Set aside about 30 minutes (you can prepare the rest of the ingredients and any accompaniments during this time).

2. Combine the ketchup, 2 tablespoons soy sauce, rice vinegar, chile garlic sauce, sesame oil and sugar in a medium bowl to make a sauce. Set aside.

3. Heat a wok or large skillet with 1 tablespoon vegetable or peanut oil over high heat. Remove the beef from the marinade with a slotted spoon and add it to the hot oil. Stir fry about 2 minutes or until beef is evenly browned. Remove beef from the pan and set aside in a clean bowl or plate.

4. Add remaining 1 tablespoon vegetable or peanut oil to the pan. Add the onion and bell pepper. Stir fry about 2 minutes or until the vegetables soften somewhat and the onion begins to brown. Add the garlic and cook 30 seconds.

5. Add the tomatoes and the sauce and mix well. Cook about 1 minute.

6. Combine 2 teaspoons cornstarch and 2 tablespoons water and mix well. Add to the wok along with the cooked beef. Cook and stir until the sauce boils and thickens.


Serve over hot rice or noodles, or perhaps even in a bowl like a stew.
Makes 4 servings.

Friday, September 25, 2009

The Omnivore's Solution: The Michael Pollan Lecture


About a year and a half ago I stood in line for about three hours to get Alton Brown’s autograph. In the end, I felt exhausted and a little frustrated (I am what you might call short on patience), and insisted that I would not be doing something like that again. Don’t get me wrong. Alton Brown was very cool. He was gracious to his fans and seemingly tireless, which I greatly admire. I’m glad to have met him, as brief as the encounter was. I’m just not the type of person who gets fired up to go to great lengths to meet a celebrity.

Then, earlier this year, I found out that “real food advocate,” and brilliant author of three of my favorite books (The Omnivore’s Dilemma, The Botany of Desire, and In Defense of Food), Michael Pollan would be speaking at Winona State University as part of their Lyceum series, I was really, really excited, but pretty nervous, too. What was I going to have to go through to see this lecture, and would it be like my Alton Brown experience?

As it turned out, there was a bit of an ordeal involved in getting the tickets, which were free of charge and in quite high demand. I got to the point where I was pretty sure I wasn’t going to get tickets, but I was very proud of my community for supporting such a great author and advocate. Local, sustainable food is “in” in this part of the country, and I got a warm fuzzy just from knowing that.
Enough about the tickets. I got them, and that’s what matters. It was a close call, but hardly painful. (I did get wet on the way back to the car, despite the use of an umbrella, but what’s a pair of drippy jeans when you’re going to get to see Michael Pollan speak!)


Mr. Pollan spoke to a packed house about the concept of “nutritionism,” or the reduction of the concepts of food and eating to mere nutritional components, devoid of culture, connection to food sources, and, worst of all as far as I’m concerned, pleasure. This seems to have led us to a national dysfunction and a collective eating disorder. “No other species requires experts to tell them how to eat,” Pollan says, but he doesn’t just make fun of our near-religious experience with nutritionism or laugh at us as we become suckers to clever marketing of “edible food-like substances” (I’m especially susceptible to the fun-size candy bars, and holiday-colored M&Ms that are everywhere now, and will be through Easter). He also doesn’t just lay the blame, rant, and go home. He, with his seemingly eternal and infectious optimism helps us to find solutions. We can eat less meat and more plants, support local agriculture and local artisan products, cook and eat at home more, and, if we can stand it, avoid buying “food” products that we’ve seen advertised on TV. (Prunes, almonds, raisins, and so on are clear exceptions to this, but I think you get the point.) We can consume less sugar and high fructose corn syrup. (Neither seems nutritionally worse than the other, but the presence HFCS is a sure sign of a highly-processed food.) We can just have a better idea of where our food comes from and decide what to eat for ourselves.

I have to admit that I need Pollan’s optimism in my life. He’s a great speaker, informative and entertaining, and his speech lacked anything like a dull moment. He also graciously signed autographs (there was not a three-hour wait, by the way), and I spoke to him briefly about the visit he had made to the CSA farm to which we subscribe. (He was impressed with, and, as a gardener, envious of the fantastic soil there.) I found Mr. Pollan very friendly and he even cheerfully answered when I asked him what it was like to meet Stephen Colbert of The Colbert Report! (He said Colbert is very fast on his feet as an interviewer, and I assured him that he handled Colbert well. You can see the May 13, 2009 interview here.)

In the end, I was anything but exhausted after this celebrity encounter. I felt renewed in my quest for a sustainable and pleasurable eating style, and I certainly knew I was far from alone on that journey. There was an entire auditorium full of people with the same concerns and hopes for a more environmentally- and socially-conscious and healthful future. I think we’ll make a good team!

At one point Pollan quoted a grandmotherly adage he had once heard, “If you’re not hungry enough to eat an apple, you’re not really hungry.” After that, I couldn’t stop thinking of apples, and since many, many fantastic apples are grown in this part of the country, and they’ve just been harvested, I had a lot of them at home. I could munch optimistically and sustainably. Of course, I had to make a caramel dip to eat them with. Nobody’s perfect.

For a taste of Pollan’s brilliant writing, you can read his open letter to the future president-elect in New York Times Magazine, entitled Farmer in Chief. I also highly recommend the books I mentioned above.


Caramel Dip for Apples
I typically use 1/3 less fat cream cheese because that’s what I have around, and have good results with this dip. I do not recommend using fat-free cream cheese.

1 8-ounce package Philadelphia-style cream cheese, softened
¾ cup brown sugar
¼ cup granulated sugar
½ teaspoon vanilla extract

Combine all of the ingredients in a medium-size bowl and stir vigorously to combine until very creamy. Dip apples in it or spread it on apples to serve.


All photos of the Pollan lecture were taken by Harry.

Tuesday, September 22, 2009

A Gift of Tomatoes and Cabbage

I can’t remember where or when I heard this, so I can’t give credit where it is due, but I seem to remember someone once saying that people give you zucchini from their garden because they know you, but they only give you tomatoes from their garden if they love you. If that is true, then our friends Jen and Jake must love Harry and I very much. Not only did Jen give us a heap of beautiful, delicious heirloom tomatoes from her garden, but also a lovely, huge purple cabbage. How did I ever get so lucky?


I suppose there is something in my recipe vault that would use both the cabbage and the tomatoes in one dish, but I’d been wanting to re-test a recipe for an Asian-style red cabbage salad with a spicy peanut dressing that I threw together last year. Well, all right, here was the cabbage. No more waiting.

I like to shred cabbage for slaws with the slicing blade on my food processor rather than the shredding blade (an idea think I got from Ina Garten on Food Network’s Barefoot Contessa). I find that the cabbage just gets mutilated and mushy when I try to shred it with the machine, where the slicing blade makes long, even and substantial pieces. I switch to the shredding blade to prepare the carrots in this salad, or any slaw for that matter. I don’t have good luck using the machine on bell peppers, however, which I also put in this salad, and thinly slice them by hand, trying to mimic (but never mock) the size and shape of the cabbage. You could use a knife to cut the cabbage as well, if you’re good at such things (I’m not) and a box grater to deal with the carrots if you have stronger fingers and tougher knuckles than I do.


The dressing for this salad has a sweetish, rich kick from the peanut butter, and some flashy umami from the soy sauce and fish sauce. (I recommend trying not to think too much about fish sauce being made of fish. Try to think of it as liquid umami unless, of course, you’re strictly vegetarian, in which case, you should know it’s made of fish). The dressing leans more, however, toward the sharp and spicy side with the chili garlic sauce and raw garlic and ginger. The lovely cabbage I received has a nice bite to it, reminiscent of a hint of horseradish. If your cabbage is wimpier and you want some more zest, you could add some shredded daikon radish or even turnip to the slaw.

My written recipe for this salad called for “½ a small red cabbage”…um, whatever that means. Clearly, I did not have a small cabbage, and I gained a little too much in my attempt at translation to mass and/or volume. In other words I shredded too much cabbage, and would have like the ratio of dressing to cabbage to be a little higher. I’ve reflected what I think is a reasonable change in the recipe below.

This recipe was a great use for some of that beautiful cabbage, (I’ve got about two-thirds of it left. Back to the recipe vault!) and I have big plans for whatever tomatoes I can’t just eat in the next few days. I hope to post something I’ve done with them, but tomorrow night, I’m headed out the “Omnivore’s Solution” lecture by Michael Pollan, author of three of my favorite food and eating-related books (The Omnivore’s Dilemma, The Botany of Desire, and In Defense of Food). I’m so excited, and I hope that I learn something new that I can post here soon!


Cabbage Slaw with Spicy Peanut Dressing
You can use any kind of cabbage you have, such as red, green, napa or a mixture. Mirin is a sweet wine that you can find in the Asian sections of some supermarkets. You could replace it with 2 teaspoons of sugar or honey.

The Dressing
2 tablespoon soy sauce
1 tablespoon rice vinegar
1 tablespoon mirin
1 tablespoon lime juice
1 teaspoon Asian chile sauce or chile garlic sauce
1 teaspoon fish sauce
3 tablespoon peanut butter
1 tablespoon sesame oil
1 clove garlic, minced
1 tablespoon grated ginger

The Slaw
1 pound red cabbage, shredded
1 cup grated carrot
½ cup diagonally sliced green onion
1 cup julienned bell pepper (any color)
¼ cup chopped cilantro
¼ cup chopped fresh mint
¼ cup chopped peanuts

1. In a medium bowl, vigorously mix the dressing ingredients until very smooth. This may take a minute or so.

2. In a very large bowl, mix together the cabbage, carrot, green onion, bell pepper, cilantro and mint.


3. Pour the dressing over the slaw and mix well to coat. Sprinkle the top with the peanuts.

This makes a really big salad, perhaps 10 servings.

Friday, September 18, 2009

The Beet Goes On


I hate beets. In my baby book, my mother translated my unspoken sentiments into, “Baby food beets are blah!” She seemed to have blamed the baby food, since beets are popular in my family, and I was doomed to be misunderstood forever. I tried beets again as a young adult, but they hadn’t improved in flavor as I grew up, and decided I’d be better off seeing other vegetables.

Then, in 2007, I made a commitment to more local and sustainable eating, and subscribed to a Community Supported Agriculture (CSA) program (this one). If the contents of the CSA boxes are any indication, beets grow well in southeastern Minnesota. There were lots of them. I was being invaded from all sides.

I couldn’t discard the evidence of my aversion, however, without wasting good food. Beets are nutritious and they look kind of pretty with their odd, bright colors found nowhere else in nature or, in the case of the Chioggia beets, stripes like peppermint candy. (If only they tasted so good!) They seemed to last forever in the refrigerator (perhaps even multiply!), and I couldn’t just say, “Aw, the beets went off. Too bad!” The guilt was getting me down. The beet would go on, and I was going to have to learn to eat it, hopefully without just holding my nose and swallowing it whole.

As in many things, my husband, Harry, was the inspiration in working through this conundrum. Yes, he really likes beets (weirdo!), but it was his intense aversion to coconut that gave me my first clues in this case. He hates the stuff. Won’t touch it. Fears it even. But he will eat Thai-style curries with coconut milk sauces. He calls it “safety coconut.” That was exactly what I needed: recipes for safety beets.

So I strapped on an apron, turned on the film noir voiceover in my head and set out to unearth safety beet recipes. First, I just tried hiding them in dishes with other root vegetables. I roasted them in pans with butternut squash, carrots, rutabagas and potatoes. Okay. I still knew they were there, and I still knew they were beets, but they were under control. Safe enough. I then sliced them very thin and hid a layer of them in Potatoes Anna, a dish of thinly sliced potatoes and butter usually baked in a cast iron pan until golden brown. Again, pretty good and pretty safe. This was working and I was getting bolder.

Finally, I hit the jackpot with a recipe for veggie burgers featuring grated beets and carrots. This one was delicious! It hardly tasted like beets at all! It’s a bit time consuming and a lot messy to make, but it makes a lot of burgers and they freeze well. I now make these a few times a year and freeze them (right next to the pesto), and enjoy, that’s right, actually enjoy them in the months that follow. In fact, I don’t even mind admitting that this is now one of my favorite dishes. These beets are truly safe. Snug as a bug in a rug.

I won’t say that I have achieved a full appreciation for the humble beet, and I’m certainly not convinced that recipes that feature beets as a main flavor component are “safe” enough for me yet. I do have a few more safety recipes up my beet-stained sleeve, however, and though it will go on and on, the beet will not defeat me.


Beet and Carrot Burgers
adapted from Farmer John’s Cookbook

1 cup finely chopped walnuts
½ cup sunflower seeds
2 cups peeled, grated beets
2 cups grated carrots
½ cup grated onion
2 eggs, lightly beaten
1 cup cooked rice, preferably brown rice
1 cup grated cheddar cheese
1/3 cup vegetable oil
½ cup finely chopped fresh parsley
¼ cup flour
2 Tbs soy sauce or tamari
3 garlic cloves, minced
¼ tsp cayenne pepper
½ tsp salt

1. Preheat oven to 350 F. Combine all of the ingredients in a very large bowl. Mix until completely combined.


2. Divide the mixture into 12 equal portions. Form each portion into a patty and place on baking pans that have been well-greased or lined with a silicone baking mat. (This will be quite messy, but hang in there!)


3. Bake the patties at 350 F for 25 minutes, or until they are well set and beginning to brown on the edges.

4. Serve immediately on a hamburger bun or in a pita (or on a plate), or cool on pans and freeze.

To freeze the burgers, place them in a single layer on a plate or pan on wax paper or parchment paper. Freeze until firm. Remove from the pan and store flat in a freezer bag or other freezer-safe container, separating layers with wax paper or parchment paper.

Wednesday, September 16, 2009

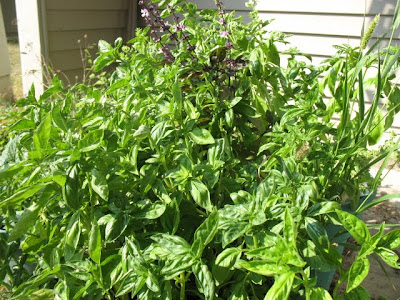
Basil Jungle

It’s that time of year. Peppers and tomatoes are mounded up in markets. There are a few more zucchini and summer squash plants that just won’t give up their ghosts, but continue to give just a little more fruit (a persistent vegetative state, perhaps?). Acorn, butternut and spaghetti squash are peeking in the doors, and apples have arrived. And my back porch resembles a jungle.

Last year, my aunt, upon gazing at my patio garden, asked if I thought I had enough basil. I’m always a little worried that there won’t be enough for a year’s supply of frozen pesto, so it took me a few moments to realize she was teasing me. And, yes, I had enough basil. I had more than enough basil. I still have pesto in the freezer from last year’s harvest. …And I did it all over again this year.

I don’t buy fresh basil in the “off season.” It’s pretty expensive, and probably came from far away. To me, basil is summer food and I try to get as much out of the season as I can. Dishes like Pasta with Cherry Tomatoes, Olives and Basil just have to wait for basil season. When its growing on the porch, I put fresh basil (as well as oregano, rosemary and thyme) in pizza and pasta sauces (like this simple one) where I would usually use it dried the rest of the year.

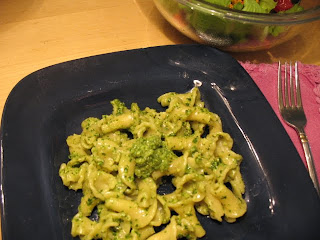
A die hard basil farmer like myself, however, would be lost (in the basil jungle) without pesto. It is the only recipe I know that uses enough basil to put a dent in my over-exuberant crop. There’s an added bonus to making pesto, too. It can easily be packaged and frozen, extending the season of pure basil satisfaction for many months …or until you’re really tired of pesto.

I wasn’t going to post a pesto recipe, since there are a zillion of them that you can find anywhere from your Italian grandmother’s recipe box (okay, so she probably doesn’t refer to a recipe, but you get the point) to the latest internet recipe sites. Besides, I rarely measure anything when making pesto, and really just cram a bunch of basil into the food processor with some parsley (I like the balance in flavor between the two herbs), Parmigiano-Reggiano cheese, walnuts (you could use pine nuts, which are more traditional, or almonds), garlic, salt and olive oil, and process it into submission. I decided to make this post anyway, since The Messy Apron is really a recipe and cooking journal, and this is what I’m doing this week. I’ve tried to approximate the amounts I used in my most recent batch of the green stuff in the recipe below.

Really, the pesto technique can be used with many different herbs and other green leaves as well as other kinds of nuts. I’ve seen recipes (and tried many of them) with arugula, spinach, cilantro and mint (one of my favorites), and sage, as well as with other nuts, such as macadamias and pistachios. I suppose the possibilities depend mostly on your personal taste, and what you planted too much of this year.

Now, if you’ll excuse me, I’ve got to take my machete back out to harvest the jungle and make some more pesto!


Basic Basil Pesto
This recipe makes a relatively thick pesto. If you like it thinner, simply add more olive oil.

3 cups basil leaves
1 cup parsley leaves
½ cup grated Parmesan cheese
½ cup walnuts, toasted
4 cloves garlic
2 teaspoons coarse salt
¼ cup olive oil, preferably extra-virgin

1. Place basil, parsley, Parmesan cheese, walnuts, garlic and salt in a food processor. Process until everything is well ground into a coarse paste.


2. With the processor running, slowly add the olive oil and process until completely smooth. Add more olive oil if the pesto is too thick.


To serve, toss pesto with hot pasta. Thin with a little pasta cooking water if desired. You can also add pesto to soups, spread it on garlic bread or pizza, or add it to sauces.

The pesto will turn a very dark green, almost brown color after storing. This is natural and still tastes good. Pouring a thin layer of olive oil over the stored pesto can help keep it bright green.

To freeze pesto, portion it out into plastic bags or freezable containers. Seal them into a freezer bag and freeze for a few months (or probably longer). You can also freeze small portions in ice cube trays.

Friday, September 11, 2009

Ready for Some Football

In our home, the kickoff of the professional football season is celebrated like a religious holiday. The calendar is cleared for game days and nights, relatives are called to discuss plans and speculate on results, and, possibly most importantly, there is special food. Despite the encroaching cooler days (there’s a five yard penalty for encroachment, by the way), there well be no formal, cozy Sunday suppers. Sunday brunch? No, that’s right out, too. There is something else we have to do, something as American as, well, the NFL. Though no games will be seen live, though there is no party in the parking lot, though the refrigerator will serve in lieu of an ice-filled cooler, there will be tailgating. Even if it’s in the living room in front of the TV, during the game rather than before, safe from autumn rains and inebriated fans, to us, it’s still tailgating.

And so “tailgate food” is what we affectionately call our Sunday afternoon fare during football season: bratwurst and hamburgers on the grill, potato salad, barbecued chicken and pork, baked beans, chili. And then there are the many snacks and finger foods that make this time of year so blessed, like bean dip.

A layered bean dip recipe with refried beans, black beans, sour cream, salsa, and, of course, cheese that I tore from the pages of Cooking Light magazine many years ago is usually the first one I dust off when opening day is fast approaching and I’m not yet in mid-season form. It’s fairly quick and very easy, especially if you don’t mind buying refried beans from a can.

I usually make my own “refried” beans. I cook pinto beans in a slow cooker with onions until they give up their own thick broth, then I season them and let them cook a little longer. Usually I serve these over rice and top them with green onions and cheese for a dish we simply call Soup Beans. (It’s one of Harry’s favorite meals, and one of those dishes that satisfies, yet allows for things like artisan bacon and Parmigiano-Reggiano cheese in the budget.) I mash up some of the leftovers in a big pan and let them boil away until they get quite thick. (I once watched a friend from Mexico treat beans similarly, so I figure I must be doing something somewhat authentic. He used a coffee mug to do his mashing, however, while I use a potato masher). Since I add no fat to the pan, I guess these are really re-boiled beans rather than refried. I’m okay with that. They’re good.


I also happened to have black beans that I had cooked myself in the freezer when I made this, but canned beans are great. The recipe is written for canned products, but I tried to estimate the equivalent in home-cooked beans. I don’t even have a can of either refried or black beans in the cupboard right now, so I’m not sure what size these “standard” cans are. I think they’re around 16 ounces.

Anyway, I don’t recommend cooking beans from scratch just to make this dip. Actually, I don’t recommend stressing about this dish at all, or doing more work than you have to. All of the measurements for the ingredients are just guidelines. (I actually used whatever was left in the salsa jar and the sour cream container. There was about ½ cup of each. Close enough.) Substitute if you want. Add other vegetables like peppers, green onions, corn or black olives. Use what you happen to have, or what is easy to get. Really, if you’re stressing about your tailgate food, I don’t think you really “get” tailgating.


Bean Dip with Sour Cream, Salsa, and Cheese

1 can refried beans (about 1 ½ cups home-cooked)
1 can black beans, drained and rinsed (about 1 ½ cups home-cooked)
½ cup sour cream
½ cup salsa
1 cup shredded cheese, such as Monterey Jack, Colby-Jack or cheddar

1. Preheat the oven to 350 F. In a medium bowl, stir together the refried beans and black beans until well combined. Spread the bean mixture into a small casserole dish or oven-proof bowl.


2. Spread the sour cream over the top of the bean mixture. Spread the salsa over the sour cream. Cover the salsa with the cheese.


3. Cover the dish with aluminum foil and bake at 350 F for 20 minutes. Remove the foil and bake an additional 10 minutes. Let stand 5 minutes or so to cool before digging in. Serve with tortilla chips.

Number of servings depends on the hunger of the fans.


Wednesday, September 9, 2009

Back to School and Cool

While the warmth of the summer tends to linger well into September, there are pretty clear signs that autumn with its cooler weather is sneaking in. There’s heavy fog in the morning (perhaps not exactly a “clear” sign) and the foliage on a few of the smaller maple trees is starting to turn. The cool-weather crops are beginning to sneak into our CSA* share as well, such as the first acorn squash of the year, a hefty fellow that conspired with the melons to break my back (luckily, the only actual casualty was a crumpled toenail.) Gone is the sweet corn and cucumbers, but in their place are broccoli, cabbage, and kale.

This is also the time when everyone is back to school. Since I’m married to an astronomy professor (and astro-blogger), back to school means scurrying to get a meal on the table in time to be eaten before night classes two days a week. That meal often ends up being some kind of leftovers or a quick pasta dish like Italian Chickpeas, Farfalle with Cherry Tomatoes, Olives and Basil, or a vegetable sauté with noodles, like the one I made this week with kale and what is probably the tail-end of the season’s yellow summer squash. I also like to put in olives and feta cheese, both of which always seem to make savory dishes extra delicious.


There are several varieties of kale. The one I had had medium-dark green, curly leaves with pretty purple stems and veins. Sadly, the purple color doesn’t have much to do with this dish, since I mercilessly strip the leaves from the tough stems and chop them up. I will use the stems of beet greens or chard, but I don’t know that the kale stems are tender enough to be salvageable.


There must have been another time when I had dark greens and summer squash at the same time, because I’d made a similar pasta dish before. I often use Swiss chard or beet greens, and I think spinach would be good as well, but this week, I happened to have the kale. (I also was prodded a bit by a recipe for braised kale with spaghetti in the Cooking Life column by Molly Wizenberg in the October 2009 issue of Bon Appetit.) If I use other greens that are more tender, I skip the covered, moist-heat cooking step and just sauté them until they are well-wilted.

For a little fancy twist, I shaved the yellow squash with a vegetable peeler. It makes the texture more consistent with that of the kale. You could also chop the squash and sauté it with the onions until tender, or just leave it out if you don’t have any and are just hungry for some dark greens with pasta, briny-bitter olives, and sharp, salty feta. Mmmmm….I’m glad there are leftovers!


Pasta with Kale, Summer Squash, Olives and Feta Cheese
You could substitute the white wine with broth or water.

8 ounces fettuccine
salt (for the pasta cooking water)
2 tablespoons olive oil
½ cup sliced onion
2 garlic cloves, minced
¼ teaspoon crushed red pepper flakes
about 6 cups chopped kale
¾ teaspoon salt, divided
¼ cup dry white wine
2 small summer squash (such as yellow squash or zucchini), shaved into thin strips with a vegetable peeler or mandolin.
¼ cup crumbled feta cheese
¼ cup chopped kalamata olives

1. Cook fettuccine in boiling salted water until done the way you like it. I like it cooked through but still a little firm.

2. While the pasta is cooking, heat the olive oil in a large skillet over medium heat. Add the onion and sauté until beginning to brown, about 3-4 minutes. Add the garlic and red pepper flakes and sauté another 30 seconds.

3. Add the kale and ½ teaspoon salt. Cook and stir until the kale is well coated with the oil and beginning to wilt. Add the white wine. Cover the pan, reduce the heat and simmer about 8 minutes or until the kale is tender. If the pan becomes dry before the kale is tender, add a little more water.

4. Add the squash and remaining ¼ teaspoon salt to the kale, increase heat to medium, and cook about 3 minutes or until the squash is tender.

5. Add the hot cooked fettuccine, kalamata olives and feta cheese. Toss together until well mixed.

Makes 4 main dish servings.


CSA = Community Supported Agriculture. Ours is here.

Monday, September 7, 2009

Just Peachy

I’ve been thinking about shortcakes since way back when strawberries were in season. While I never got around to making any, I had hoped to try a recipe for shortcakes studded with crystallized ginger (dried and sugar-coated ginger root). Then, more recently, I saw good fresh peaches from all over the country in the store where I get most of the produce that doesn’t come from the CSA*. I knew that they grew peaches in the Southeast, especially in Georgia (no one can visit Georgia without being reminded of this) and South Carolina, but the California, Colorado, Idaho, and even Michigan peaches were a bit of a surprise.

Not wanting to stand staring like a confused cook for too long, I quickly opted for the Michigan peaches. They were smaller, but had nice color and feel, smelled good (like peaches!), had a better price, and came from less far away. It turned out that they tasted good, too!


I’m not sure where I got the idea that peaches and ginger are a good match. It could be that I’ve read it and heard it so much in cookbooks, magazines and on television shows that it has just become something I now file under “Knowledge, Common” in my mind. Or perhaps it was the ginger-peach scented candle I had once upon a time from Pier 1 Imports. If my dessert tasted as good as that candle smelled, I’d be in business!

This recipe could probably do with some more testing, but, hey, this is a blog. I’m going to post it anyway. The shortcake batter was a bit wetter than I would like, so, next time I make this, I think I’ll start with ½ cup of half and half and add more as needed. I also made the shortcake biscuits too thin (I cut the dough into 8 portions; I recommend making 6 instead). They were still really good, but I would have liked them to be easier to split in half.


This dessert uses ginger root in three different forms: ground (ie, from a jar), fresh, and crystallized. The biscuits get a double dose with the ground ginger mixed in with the flour, and sweet, spicy bits of crystallized ginger waiting like pockets of buried treasure in the dough. I cooked minced fresh ginger with the peaches, so they were lightly infused with its unique but somewhat citrusy flavor.

I think the biscuits would be good on their own as a snack or as part of a complete breakfast (they freeze well), especially if gilded with a swipe of butter, perhaps flavored with lemon zest or more ginger. Taking the time to egg wash the tops and sprinkle them with coarse sugar (turbinado) gives them a sweet, crunchy crust. The peaches could be served on their own as well. They end up with a light syrup that soaks into the biscuits, but would probably also be nice over ice cream or yogurt and granola.


Triple Ginger Peach Shortcakes
Whole wheat pastry flour increases the WFQ** of this dessert (and uses up some of the five-pound bag I bought). You can replace it with more all-purpose flour if it is more convenient

For the Shortcake Biscuits

1 cup all purpose flour
1 cup whole wheat pastry flour
1 tablespoon baking powder
2 tablespoons ground ginger
6 tablespoons cold unsalted butter, cut into small pieces
¼ cup finely chopped crystallized ginger
½ to ¾ cup half and half
1 egg, beaten with a little half and half or water
Turbinado sugar (such as Sugar in the Raw brand)

1.Preheat the oven to 400 F. In a large bowl stir the flours, baking powder, and ground ginger together with a whisk until well combined. Stir in the crystallized ginger.

2. Add the butter and cut it into the mixture with a pastry blender, knife or your hands until it looks crumbly.

3. Add the half and half and stir until just moistened with no remaining dry flour. You may wish to start with ½ cup and add up to ¼ cup more if needed.

4. Turn the dough out onto a floured surface. Work it gently into a ball, then pat it out into a rectangle about 1 inch thick. Cut dough into 6 equal squares. (You could also cut the dough into circles with a biscuit cutter if desired).

5. Place the biscuits onto a greased or lined pan (I use a silicone baking mat). Brush the biscuits with the egg wash and sprinkle each with turbinado sugar. Bake at 400 F for 18 minutes. Cool on a wire rack.

For the Peaches

2 tablespoons minced fresh ginger
2 tablespoons unsalted butter
½ cup sugar
6 ripe but firm peaches, sliced
1. Place the ginger, butter and sugar in a large skillet over medium low heat. Cook and stir until the butter and sugar have melted together. Cook 2-3 minutes more.


2. Add the peaches and cook 15 minutes, stirring occasionally.


To Serve

Slice the shortcake biscuits in half horizontally with a serrated knife. Spoon peach mixture onto the bottom half of each shortcake and top with the top half. Top with whipped cream or ice cream if desired (you know you want to!)

Makes 6 servings.


* CSA = Community Supported Agriculture. The one to which we subscribe is here.

**WFQ = Whole Food Quotient