Thursday, July 30, 2009

Summer Fruit Crisp

Each season has its fruits. In the late spring and early summer, there are strawberries and rhubarb. Autumn has apples, pears and cranberries. And right now the markets are full of stone fruits: peaches, nectarines, apricots, plums and cherries. All of these are excellent candidates for my favortie treatment for a season's fruits: fruit crisp.

Even more than pies and tarts, I like crisps. For one thing, they're easier to make. Just mix the fruit with sugar, a thickener such as flour or cornstarch, and perhaps an enhancing flavor like extract, citrus zest or warm spices like cinnamon, nutmeg and cloves. Then, you just toss together a topping of oats, flour, nuts and brown sugar, sprinkle it over the top and bake it. The most difficult part is waiting for the darn thing to cool enough to eat without blistering your tongue!

I've been trying to develop a basic recipe for fruit crisps that's just ready to go no matter what fruit is abundantly on hand. Most recently, it was piles of dark bing cherries and red plums. I couldn't help but keep buying cherries because their price was so good. And the plums were slightly soft when gently squeezed and smelled like, well, plums (something that's becoming rare in today's bullet-proof supermarket fruit).

For my streusel-like topping, I went with whole wheat pastry flour to bump up the flavor as well as the WFQ* (and because I bought a 5 pound bag of the stuff), melted butter for the fat (but you could use a neutral oil like canola, or a nut oil, which is really good), and almonds. I just think almonds and cherries are a match made in fruit-and-nut-topia, and good almond extract, which I added to the fruit mixture, is like a performance-enhancing drug for baked cherries.


I let the fruit speak for itself when I made this dessert. I didn't add too much sugar, and I didn't bake it into submission. There was still a bit of bite to the plums and cherries in the end, and what I think of as a pleasant, fruit-in-season tartness. If you think your fruit could do with a little more sugar, by all means add more, and if you like your fruit more like a puree or jam, just bake it longer.

Fruit crisps are a good way to start baking if you're inexperienced and not ready to tackle something more complicated, or are worried about your ability measure accurately. This stuff is pretty forgiving, rustic, even. If you are off in your measurements, it doesn't really matter. You could probably even use ready-made pie filling instead of fresh fruit if you have to, but you didn't hear that from me.

What you did hear from me, however, is that fruit crisps must, must, be served with a scoop of vanilla ice cream. A dollop of whipped cream will do in a pinch. The only exception to this rule is if you eat leftover crisp for breakfast. It is mostly fruit and oatmeal after all. Nothing wrong with fruit and oatmeal for breakfast!


Cherry-Plum Crisp

filling
2 cups pitted dark sweet cherries
3 cups coarsely chopped pitted plums
2 tablespoons cornstarch
1/2 cup granulated sugar
1 teaspoon almond extract


topping
1 cup rolled oats
1/2 cup whole wheat pastry flour (or all purpose flour)
1/2 cup packed brown sugar
1/4 cup chopped almonds
1/4 cup unsalted butter, melted

preheat oven to 350 F

1. Stir all of the filling ingredients together and pour into an 8" x 8" baking dish.

2. Combine the oats, flour, brown sugar and almonds and stir well. Pour the melted butter over the mixture and stir it all with a fork until the dry ingredients are well-moistened by the butter.

3. Cover the fruit filling mixture with the topping mixture, spreading it evenly over the top. Bake at 350 F for 35 to 45 minutes or until the top is golden brown and the filling is bubbly. If you desire to bake for the longer time, cover the dish with foil if the topping is over-browning.

4. Remove from the oven and cool on a wire rack 20 minutes or more. Serve warm with a scoop of vanilla ice cream or a dollop of whipped cream.

Serves 6


* WFQ: Whole Food Quotient

Sunday, July 26, 2009

Potato Salad

“They call me Tater Salad.”
- Ron White, comedian


If I don't know what to make for a potluck event, I put together a potato salad. If I want to make something ahead to go with grilled meats or veggie burgers, I make potato salad. If I were going to plan a picnic, I'd plan potato salad. And the best part is that it doesn't have to be the same thing all the time. I make traditional potato salads with mayonnaise dressings, bell peppers, and hard boiled eggs. I make one with Chinese flavors. I've made one with barbecue sauce in it. And for lighter fare that has less chance of going "bad" if it sits out a while I've recently started making potato salads with vinaigrettes.

A lemon vinaigrette with lots of herbs from the container garden, which is now flourishing, is just right when I get some thin-skinned organic potatoes in our CSA box. In the recipe below, I used a mix of basil, tarragon, and lemon thyme. The little tickle of anise flavor from the tarragon compliments similar flavors in the basil, and the lemon thyme works well with, well, the lemon.


Besides, the lemon thyme is somehow significantly more prolific than common thyme in my humble porch garden.


You could use whatever herbs you like, or have readily available. I've also used green onions (scallions) in place of the sliced onions, or you could also use chives. Grilled vegetables such as zucchini or yellow squash, or possibly bell peppers would also be nice additions. Mixing the potatoes with the vinaigrette while they are still a little warm allows them to soak up some of the lemon and olive oil flavors. To peel or not to peel is up to you. When I can get my hands on thin-skinned, young, organic potatoes, I feel like doing more than scrubbing off the dirt is somehow and insult to the tuber.

I like having this extra addition to my potato salad repertoire, especially since it uses up lots of the herbs I planted in my springtime fit of over-ambition. Mayonnaise, Chinese flavors, or vinaigrettes, Ithink I'll have plenty of potato salad variations to keep me from getting bored all summer. I've been known to overcook a potato or two in preparation for salads, but that just makes the salad a little creamier. There's nothing wrong with a creamy potato salad.


Lemon Herb Potato Salad
Inspired by a recipe in Cooking Light magazine

2 pounds red potatoes, or other thin-skinned, potatoes
1/4 cup extra virgin olive oil
grated zest of 1 lemon
3 tablespoons fresh lemon juice
2 tablespoons dill relish
1/2 teaspoon kosher salt
1/8 teaspoon freshly ground black pepper
2 tablespoons minced fresh basil
2 tablespoons fresh thyme leaves, preferably lemon thyme
1 tablespoon chopped fresh tarragon
1/3 cup sliced onion or chopped scallions or chives

1. Place potatoes in a large pot and cover with cold water by a few inches. Cover the pot and bring to aboil. Reduce to a simmer and cook until potatoes can be easily pierced with a fork. Drain and cool.

2. In a large bowl, combine olive oil, lemon zest and juice, dill relish, salt and pepper. Whisk until well combined. Stir in basil, thyme and tarragon.

3. When the potatoes have cooled (preferably still a little warm) peel if desired and chop into 1-inch cubes. Add to the dressing in the bowl. Add the onions. Stir gently to coat the potatoes well. Taste for seasoning and add lemon juice or salt if necessary.

Serve at room temperature or chilled. Makes about 6 servings.

Tuesday, July 21, 2009

I May Just Be a Fraud

There is one thing that totally undermines my authenticity as a cook, a foodie, and someone who blogs about food. I've never been to France. If you read food-themed memoirs or the introductions to cookbooks (or even if you've just seen the movie Ratatouille) you know that the road to culinary and gastronomical credibility runs directly through Paris, France.

That's why I feel so faux writing about Pain au Chocolate. Not only have I never eaten it in Paris, but I can't recall that I'd ever eaten it anywhere before I made it myself last Friday. Maybe what I made wasn't real Pain au Chocolate after all. I could be a complete fraud. The memories of biting through a thin but crisp crust into rustic and soft but chewy bread and a pocket of warm, creamy dark chocolate, however, leave me with this thought: I don't care if it is authentic or not. What I made is delicious. It is delicious and comforting, simple yet decadent.

And, it was pretty easy, because I had a tool up my sleeve (or in my refrigerator) that allowed me to cheat: bread dough. I'm still making doughs from Artisan Bread in 5 Minutes a Day. (I have a post on that here and an update in the comment section.) I used the basic rustic white bread dough, the recipe for which, you can find here, and a bar of Ghiradelli 65% cacao dark chocolate.

I'm not sure how much dough I used, but I happened to have just enough left to make eight rolls a little larger than hamburger buns. Lucky me! The chocolate bar was conveniently scored into eight squares. I broke the squares into chunks, then wrapped the dough around each broken square and formed it into a nice bun shape. I placed the buns on a pan lined with a silicone baking mat (you could just lightly grease the pan) and preheated the oven to 450 F. I baked most of the buns about 10 minutes, then removed and cooled them and wrapped them up and froze them for later enjoyment. The ones we were going to eat right away, I baked another 10 minutes (approximately...I was reading a mystery novel, and should have been paying more attention) until they were golden brown on the outside.

Now came the most difficult part of the wole process: waiting for them to be cool enough to eat!


Later, I baked off a couple of frozen partially-baked pain au chocolate, and they were just as good if not better. I simply put them on a pan while waiting for the oven to heat to 450 F, then baked them for 10-15 minutes. They were golden brown on the outside, and I could hear the chocolate bubbling inside.

I think you could use any bread dough you like to make these, but I have to say I really like using the dough from Artisan Bread in 5 Minutes a Day. To tell the truth, if you don't have the time or inclination to make your own dough, you could probably make something with a refrigerated or frozen dough from the supermarket. (How about crescent roll dough from a can?) You could even buy a great loaf of bread, such as a good, crusty French loaf, cut it open, stuff a bar of chocolate inside and warm it up in the oven just enough to crisp the crust and melt the chocolate. A chocolate melt sandwich. What could be bad about that?

Of course, what do I know? I've never even been to France. I may just be a complete fraud!

Friday, July 17, 2009

Breakfast of Champions

“…the food was good solid stuff for a cold morning, all calories and fat and protein and maybe a vitamin crying softly because it was all alone.”
-from Guards! Guards! by Terry Pratchett
If this resembles your breakfast, you may need a bit of an overhaul. Perhaps some additional vitamins, minerals, fiber, and, of course, flavor to give that lonely vitamin a bit of company.
We’ve all heard (a few hundred thousand times) that breakfast is the most important meal of the day. As a coffee drinker, I have to agree that the first cup, at least, is indeed more important than anything else I’ll consume in the hours to come. I’m not sure I was all that convinced of the importance of breakfast for most of my younger years. Once I started eating something first thing in the morning, however, I couldn’t change my ways. Breakfast is important because it is addictive (even aside from the caffeine). Now, if I don’t eat breakfast, I feel pretty terrible.
I’ve mentioned before that I really like breakfast foods, and when I have time, I like to make pancakes, waffles, omelets, muffins or even something fancy like an Eggs Benedict Salad. Not being a morning person, though, those tend to be brunch foods, and breakfast is reduced by necessity to toast (usually with homemade bread, at least), yogurt, or cereal. (Harry’s favorite do-it-himself breakfasts include a grapefruit, a personal-sized watermelon, or a bagel accompanied by a chunk of cheese and a chunk of summer sausage. That final one may be beginning to resemble Pratchett’s quote above.)

Boxed breakfast cereals are pretty decent, I suppose, at least the ones that offer more than super-refined starches and sugar and a dizzying array of artificial colors. In my quest to make as much food from scratch as I could (it has been recently suggested that I should make my own ketchup!) I bid most flakes, crisps, and o’s adieu in favor of homemade granola.

I admit, I was pretty surprised to learn how simple granola really is: oats (or other rolled cereal) and some kind of sweet, flavorful coating all baked in the oven. Nuts, dried fruit, and some sort of neutral nutritive, such as flax seed meal or wheat germ, are no-brainer additions. (I would prefer to add coconut, but Harry won’t touch the stuff.) Now, I’m just as hooked on granola as I am on the concept of breakfast and, of course, the coffee that always comes along for the ride.
Here is a basic recipe for granola. I vary it depending on what I have in the cupboard, changing up the nuts and dried fruits as I need to. This is what I made last time I made granola. I like it mixed with yogurt, or with milk or vanilla soy milk poured over it. It lasts well in an air-tight container about a week. I usually freeze about half of it to keep it longer.
Decades ago, granola may have developed a reputation as fuel for alternative lifestyles, but I say, as easy as it is to make, granola is not just for hippies anymore.

Granola

3 cups old fashioned rolled oats
1 cup quick barley
1 cup chopped walnuts
1/4 cup flaxseed meal
1 teaspoon cinnamon
1/2 teaspoon freshly grated nutmeg
1/4 teaspoon salt
1/4 cup honey
1/4 cup maple syrup
1/4 cup brown sugar
1/4 cup walnut oil or canola oil
1 cup dried fruit


Preheat oven to 325 F

1. In a very large bowl, mix the first 6 ingredients.

2. In a small bowl, mix honey through oil. Stir until well combined. Pour over the oat mixture and stir well to coat.

3. Spread mixture evenly in a large baking sheet coated with cooking spray or lined with a silicone baking mat. Bake at 325 F for 30 minutes, stirring every 10 minutes.

4. Carefully remove to a large bowl. Add dried fruit and stir to combine. Cool completely
Makes about 7 cups.

Tuesday, July 14, 2009

Cabbage Head


The cabbage head has a very humble reputation. With traditions born of poverty or plain lack of creativity, it's often greeted with sighs or wry expressions of disappointment. I say unfair! The very qualities that make cabbage a food of subsistence are those that should make it a superstar! It is loaded with vitamins (B2, B6, folate, C and K), minerals (phosphorous, potassium and manganese, oh my!), and that cancer-fighting class of chemicals that have been given the not-very-illuminating name of "phytonutrients" (or, nutrients in plants...duh.). It also has fiber, and, something more appreciated today, no fat (and it would laugh at the concept of trans fatty acids). It can last all winter if properly stored, which means you can get a hefty dose of what's good for you when there's not much growing in the snow.

For the sake of comparison and contrast, take a more popular food, one that gets cheers from children and adults alike, say, some kind of Cheez Doodles. Vitamins, minerals and phytonutrients? I don't think so. Absence of calorie-laden fats? Um, no. (I won't go down the "partially hydrogenated" road.) Sure they can last all winter if you don't open the bag, but good luck with that. Sure, they're crunchy, but does a cabbage not also have crunch? And cabbage would never stain your fingers day-glo orange, even if you ate it with your fingers.

Okay, so the contrast may be an insincere one, but the point is that cabbage should get a little more respect. Chances are that some form of cabbage kept your ancestors alive at some point in history.
Since I'm usually cooking for two (although I'd happily cook for you, too, if you want to come and visit), I can cut a nice big head of cabbage, like the one above from our CSA, in half and use it two different ways. On the first cabbage day, I finely chopped the cabbage, sauteed it in butter, and flavored it with cider vinegar and caraway seeds. It is a simple dish, but don't let that fool you. It is flavorful and satisfying. I love caraway, and think it's great with cabbage, and the vinegar allows a hint at the tart, fermented flavors of sauerkraut, but with instant gratification. (No, I don't make my own sauerkraut, but am fully aware that nothing compares to homemade.)

You can use a food processor to cut up the cabbage (I didn't happen to have space on the counter the day I made sauteed cabbage). I don't use the shredding blade, but prefer to cut the cabbage into small wedges and use the slicing blade. I find the shredder on my machine pulverizes cabbage more than I like, especially for this dish.


While this was cooking, Harry asked if it was wrong that the aromas wafting through the apartment made him think of comfort food. No, Dear Husband, you're far from wrong. Eat cabbage and be comforted.


Sauteed Cabbage with Caraway and Cider Vinegar

2 tablespoons butter
1/2 large head cabbage, chopped or shredded (about 6 cups)
1 teaspoon kosher salt
3 tablespoons cider vinegar
1 teaspoon caraway seeds

1. Melt the butter in a large frying pan over medium heat. Add the cabbage and salt and saute for 10 to 12 minutes until the cabbage is wilted and just begins to brown, stirring often.

2. Add the vinegar and caraway seeds. Reduce the heat to medium-low and cook, stirring often, about 15 minutes more or until the cabbage has softened, but still has a bit of crunch.

About 4 side dish servings


Sunday, July 12, 2009

Lazy Man Peas


I wouldn't eat the dull green, mushy, overcooked peas that seemed ubiquitous when I was a kid, but if I could pick some "real" peas off those stringy vines in the garden, I'd stay out there and eat them all day. I don't think peas grew so well in my mother's sandy garden, but they did in my grandparents' Eden of Northern Michigan.

I remember being in that garden with Grandpa Vic when he told me about a new kind of pea he had planted. He called them Lazy Man peas. "You don't even have to take them out of the pod. You just eat them pod and all." Of course I didn't tell him that I was pretty happy to eat the pods of regular peas once I had unzipped the package and plucked out the sweet jewels inside. Sure, they were stringy, but I could spit out the fibrous stuff when no one was looking. Just one crunch of the Lazy Man peas, however, and I knew there was a difference. The pod was plump, juicy and flavorful.

Those new Lazy Man peas must have been Sugar Snap peas, which were introduced by a breeder in the 1970s, shortly before my grandpa would have procured them for his vegetable garden (although fleshy-pod peas have been around for 300 years or more. I guess these Sugar Snaps were better, though.)

Now, the CSA to which we belong grows Sugar Snaps, and I can't get enough of them. The season seems to be coming to an end, but I adapted a recipe for pickled Sugar Snap peas I found on one of my favorite food blogs, Smitten Kitchen, so I can preserve them for a while longer. I've had them in a bowl in the refrigerator for a few days, and they taste pretty good already. The author of Smitten Kitchen suggests that they could be enjoyed within 24 hours of immersion.

I gave my version a little Asian flair by adding rice vinegar and a little fresh ginger. They're a nice combination of pickle-sour with a touch of sweet, and a little heat. I'm thinking they will be good as an accompaniment to the chickpea pancakes I've made from the book Madhur Jaffrey's World Vegetarian.

The peas we get from our CSA are quite tender and rarely have thick strings, but the stem end of the pea should be removed, and the strings on your peas may need to be as well. Once you snap off the stem end of the pod, you can usually sort of unzip the string from one side.


Lazy Man Pickles (Pickled Sugar Snap Peas)
Adapted from Smitten Kitchen

3/4 cup distilled white vinegar
1/2 cup rice vinegar
1 tablespoon kosher salt
1 tablespoon sugar
1 1/4 cups cold water
1 pound Sugar Snap peas
4 garlic cloves, sliced thin
1 inch piece of fresh ginger, peeled and sliced thin
1 large or 2 small dried chile peppers, broken in half

Note: "Nonreactive" equipment and containers need to be used in this recipe in order to keep the acidic vinegars from tarnishing surfaces or leaching undesirable chemicals.

1. In a nonreactive saucepan, heat the vinegars, salt and sugar until the sugar and salt have completely dissolved. Add the cold water, and set aside to cool.

2. Remove the stem ends and any strings from the Sugar Snap peas. Place the peas, garlic, ginger, and chile in a large bowl or jar. When the liquid mixture is cool, pour it over the pea mixture.

3. Cover and allow to pickle in the refrigerator at least 24 hours. Longer is better.

Tuesday, July 7, 2009

Grill, Baby, Grill


'Tis the season to be grilling! It's back to "normal" post-solstice temperatures (we had a rather cool spell...you'll never hear me complain about that) and at such times I try to avoid using the kitchen in the late afternoon, except to make salads and scoop ice cream. The grill wheels itself out to our rescue in an admirably faithful manner. (Okay, so I have to wheel it out myself, but it's still faithful, despite being stored for a few winters on the porch without a cover, partially exposed to the bitter Minnesota elements.)

I love grilled food. Anything I can cook over even our relatively flavorless (compared to charcoal) propane flame somehow always tastes better. I love to grill vegetables and potatoes and even bread (and the occasional marshmallow destined to be squashed between graham crackers with a chocolate bar), but it seems that meat tends to take center stage, or center grate, on our grill. And I love barbecue sauce. Our grill may be the greatest saboteur in my hopes of someday being at least mostly vegetarian.

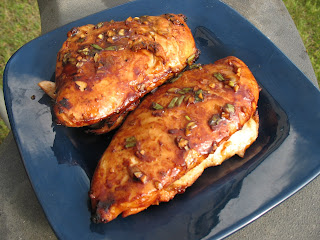
I have dreams of someday perfecting my own barbecue sauce (Anne Marie's Super-Atomic Gusto Sauce: guaranteed to stain your apron and blow your mind!) I haven't even begun my food detective work on that case yet, but I do have an Asian-inspired marinade/sauce that is quite reliable. It is flavored with hoisin sauce, a Chinese barbecue-style sauce that I'm not crazy about in dishes like stir fry or fried rice. But put it on a barbecue, and I'll lick it off my fingers.

This marinade is easy to throw together and will keep for a while in the refrigerator (just don't keep any sauce in which you already marinated something.) It makes enough to marinade and glaze about six servings of your choice of protein. (I usually make half of this recipe, since I most often cook for two.)

I have picked, chosen, and consolidated several recipes for hoisin-based marinades and sauces and have settled (for now) on one that is almost as versatile as it is delicious. I've used it on chicken, steak, pork loin, salmon and tofu, and have loved the results with each one. I bet you could brush it on shrimp or scallops as well. I just marinate whatever I'm cooking in some of the sauce, putting the remainder aside to brush on later. I marinate beef, chicken and pork for several hours; salmon for 30 minutes; and tofu for as long as is convenient. When the marinating is complete, I discard the marinade and put the food on a hot grill.


I then glaze it with the reserved sauce as it cooks. It forms a nice glaze and has tremendous flavor that hints at American-style barbecue sauce, but with a performing cast that is clearly Asian, with soy sauce and sesame oil politely requesting notice.

You should be able to find hoisin sauce in the supermarket with other Asian ingredients in the ethnic foods aisle. Shao Hsing wine (you may find it spelled differently, like shaoxing) is harder to find, but is increasingly available in ethnic aisles at supermarkets as well. I think I found my bottle at Woodman's. If you can't find it, you could substitute dry sherry, or broth, which is probably more convenient.

Chinese-Style Barbecue Sauce and Marinade

1/2 cup hoisin sauce
1/4 cup finely-chopped green onions (scallions)
1/4 cup soy sauce
2 tablespoons rice vinegar
4 garlic cloves, minced
2 tablespoons peeled ginger, minced
2 tablespoons sesame oil
2 tablespoons Shao Hsing wind, dry sherry, or broth
1/2 teaspoon crushed red pepper flakes

1. Combine all ingredients and mix well. Use as marinade or barbecue sauce.

Makes enough for at least 6 servings of grillable protein.

Wednesday, July 1, 2009

Twenty-Five and Counting


I’m celebrating. This is my 25th post to The Messy Apron (Hooray!...for she’s a jolly good blogger…). I have to admit that my life has changed at least a little since I started blogging about what I’m cooking, developing and sharing recipes, and taking digital photos of what I’m about to devour. For one thing, I say things like, “Where’s the camera? I’m going to start dinner,” significantly more often.

I also am documenting recipes and other kitchen adventures better than I did before, which was a major goal of this whole endeavor. I still have a long way to go before I can give my recipe collection the illustrious title of “Organized,” but it’s just been too much fun writing these little notes to you over the last few months. (I even understand that a few of these posts have been printed and mailed to my grandmother, who doesn’t own a computer.)

So what does a food blogger do to celebrate the 25-post milestone? Why, bake a cake of course.

I had plenty of leftover rhubarb from the CSA*, homemade yogurt, and a recipe from Cooking Light Magazine that was close enough. This cake is nicely tart from the rhubarb and manages to be very moist without being mushy. We ate it when it was too hot (delicious), just right (delicious), and a few days old (still delicious!) It stays moist without getting watery or gloppy as a few days go by. Even though there were only two of us eating it, it didn’t last more than a couple days. I’ll admit it here and now: we even ate it for breakfast.

I’ve started adding whole wheat pastry flour to more of my baking recipes to help improve their WFQ**. It is becoming increasingly easy to find, even in supermarkets. Usually I purchase it in bulk from the local co-op, so I can buy just what I need short-term, but last week I bought a whole bag of Bob’s Red Mill brand at a supermarket (Woodman’s, to be exact. They have almost everything!) Now I have to use up 5 pounds of whole wheat pastry flour! It looks like there will be a lot more to post to The Messy Apron for a long time to come!

Rhubarb Yogurt Cake
Adapted from Cooking Light magazine
3 cups of chopped rhubarb is a little less than a pound.

Topping
½ cup light brown sugar
½ teaspoon cinnamon
2 tablespoons unsalted butter, melted
½ cup chopped pecans

Cake
3 cups finely chopped rhubarb
2 tablespoons all-purpose flour
1 ½ cup light brown sugar
6 tablespoons unsalted butter, softened
2 large eggs
1 cup plain yogurt
1 teaspoon finely grated lemon zest
2 teaspoons vanilla extract
1 ½ cups all-purpose flour
1 cup whole wheat pastry flour
¾ teaspoon baking powder
¼ teaspoon baking soda
1 teaspoon cinnamon
½ teaspoon salt

Preheat oven to 375 F.

1. To prepare the topping, mix all of the topping ingredients together until the melted butter is completely absorbed in the mixture. Set aside.

2. To prepare the rhubarb, toss it with the 2 tablespoons flour until all pieces are coated.

3. Combine 1 ½ cups brown sugar in the bowl of a heavy-duty stand mixer or another large bowl. Beat with mixer at medium speed until the butter is completely incorporated into the sugar.

4. Add the eggs one at a time, beating well after you add each one. Add the yogurt, lemon zest, and vanilla and beat at medium speed until the mixture is light and fluffy and pale in color.


5. Combine the flours, baking powder, baking soda, cinnamon and salt in a large bowl. Stir them together with a whisk to combine. Gradually add to the liquid mixture while beating at low speed, just until combined. Stir in the rhubarb.

6. Grease an 8-inch square baking dish well (I use nonstick cooking spray). Pour the cake batter into the dish, spreading it evenly. Sprinkle topping mixture evenly over the top of the batter.


7. Bake at 375 F for 30 minutes. Cover the cake loosely with foil to prevent the topping from burning. Bake an additional 30 to 40 minutes. Test for doneness by inserting a toothpick or narrow skewer into the center of the cake. It will come out clean (not coated with batter) when the cake is done. Serve from the pan.

Makes 9 generous servings


* Community Supported Agriculture. Ours resides here on the internet and near Rushford, Minnesota in the real world.

**Whole Food Quotient