
 If you’re intimidated by roasting your own peppers, you can use roasted red peppers in a jar for this recipe (in fact, with the price of red bell peppers being what it usually is, those in the jar can be more economical). Roasting peppers isn’t difficult, though. Just place whole peppers under the broiler and let them get black all over. You could also do this on a grill. The smoky flavor they get is even better than what the oven broiler has to offer. The method is the same. The heat just comes from the opposite direction.
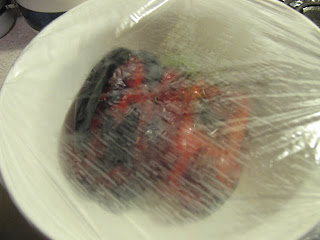
 You may think you’ve ruined your peppers at this point, that you’ve charred them beyond redemption. Trust me, they’re just fine. Place them in a large bowl, cover with plastic wrap and leave them to their steam bath for about 20 minutes or so (you could also put them in a paper bag). When they’re cool enough to handle, the charred skin peels right off, and you have tender pepper flesh ready for whatever application you have in mind.
Roasting garlic is another useful technique with many applications. You just wrap a whole head of it up in foil and bake it until it’s soft enough to be squeezed from its skin like a paste. I just used a small head of garlic in this recipe, but you could use more, or roast a larger head, use part of it, and refrigerate the rest to use later.
Since it starts with a vegetable, this might be little more healthy than many of the offerings in my dip repertoire (or Dip-ertoire?). I even tend to use reduced fat cream cheese and sour cream, because I find them to be a reasonable compromise between flavor and calories. I like to serve this dip with crackers or tortilla chips but celery sticks are also good if you like to take that health thing a little further. Pita chips would also be good, as would pretty much anything mildly-flavored but dippable that you might keep around to accompany your own Dipretoire. Snack on, good people, snack on!
Roasted Red Pepper, Garlic, and Onion Dip Recipe
You could use jarred roasted red peppers and skip the roasting steps.
2 large red bell peppers
about ¼ large yellow onion
1 small whole garlic head
1 ¼ teaspoon olive oil, divided
½ cup sour cream or plain yogurt
½ cup cream cheese (4 ounces)
1 teaspoon ground cumin
¼ cup chopped parsley
1 tablespoon lemon juice
½ teaspoon salt
¼ teaspoon black pepper
1. To roast the peppers: preheat the broiler. Place the whole peppers on a baking sheet and position them in the oven rack position closest to the broiler. Broil, turning the peppers as each section gets charred until the skin of the peppers is blackened all over.
2. Place the peppers in a bowl and cover the bowl tightly with plastic wrap. The peppers will steam themselves, allowing the skin to be removed. Let stand for 20 minutes or until the peppers are cool enough to handle easily.
You could use jarred roasted red peppers and skip the roasting steps.
2 large red bell peppers
about ¼ large yellow onion
1 small whole garlic head
1 ¼ teaspoon olive oil, divided
½ cup sour cream or plain yogurt
½ cup cream cheese (4 ounces)
1 teaspoon ground cumin
¼ cup chopped parsley
1 tablespoon lemon juice
½ teaspoon salt
¼ teaspoon black pepper
1. To roast the peppers: preheat the broiler. Place the whole peppers on a baking sheet and position them in the oven rack position closest to the broiler. Broil, turning the peppers as each section gets charred until the skin of the peppers is blackened all over.
2. Place the peppers in a bowl and cover the bowl tightly with plastic wrap. The peppers will steam themselves, allowing the skin to be removed. Let stand for 20 minutes or until the peppers are cool enough to handle easily.
3. Remove the peppers from the bowl and peel off the blackened skins. Remove the stem, seeds, and any tough membranes from the peppers. Place the roasted pepper flesh in a food processor.

4. To roast the garlic and onion: reduce the oven temperature to 400 F. Chop the onion coarsely and place on a piece of aluminum foil large enough to wrap it. Drizzle with 1 teaspoon olive oil and wrap in the foil. Remove the outer, papery skin from the garlic head. Keep the cloves intact and attached to each other. Place the garlic on a piece of aluminum foil large enough to wrap it. Drizzle with remaining ¼ teaspoon olive oil. Wrap in the foil.
5. Place the wrapped garlic and onion in the oven and roast at 400 F for 45 minutes, or until the garlic is very soft. Unwrap and set aside until cool enough to handle. Place the onion in the food processor with the peppers. Squeeze the roasted garlic out of the cloves and into the food processor.
5. Place the wrapped garlic and onion in the oven and roast at 400 F for 45 minutes, or until the garlic is very soft. Unwrap and set aside until cool enough to handle. Place the onion in the food processor with the peppers. Squeeze the roasted garlic out of the cloves and into the food processor.
6. To make the dip: process the peppers, onion and garlic in the food processor until well chopped.

7. Add the remaining ingredients and process until smooth. Taste and adjust seasonings if necessary. Transfer to a bowl and chill until ready to serve (it’s also good at room temperature). Serve with chips, crackers or vegetable sticks.


 At least I do all these things. And in the last week of January, I finally admit that I’m getting a little (just a little) tired of eating squash. This recipe, however, is one of our favorites. It’s just some flavored-up squash puree poured over hot pasta and topped with a blue cheese sauce.
 Well, my new little freezer is going to keep gifting me with squash puree for a little while yet, so next time you see me, don’t be surprised if I appear a little more orange than you remembered.
 4. To prepare the blue cheese sauce: melt the butter in a small saucepan over medium-low heat. Add the 1 minced garlic clove and cook about 30 seconds. Add the flour and whisk to blend it well with the butter without any lumps. Cook for about 1 minute, whisking frequently.


 I made an adaptation of a recipe my mom used to make, often for big family parties like the one she put together when Harry and I were moving from northern Michigan to southern Texas. The meat was very popular, so when we missed our own going-away party because of problems with getting a rental truck for moving (I won’t go into it…you’ll just lose your appetite) it was the one dish that was entirely gone when we finally arrived.


 I seem to have overachieved in my accumulation of pumpkin in October, November and December, and I had to get back to using it. I think I’m still wearing some of the
  I started with a recipe from
  Since I felt like I was being so good with this high WFQ pumpkin bread batter, I decided to add just a little bit of bad in the form of a splash of bourbon. Its contribution to the final product is subtle, but I think it adds some complexity, especially with a bite of gooey date. You could leave it out and probably not miss it, and it would be ludicrous to go out and by a bottle of bourbon just to make this bread. Or perhaps a bottle of bourbon would be just the right thing to accompany a daring discussion of religion and politics with a side of pumpkin bread.


