Sunday, August 29, 2010

Upgrade: Chocolate Zucchini Bread

We were finally able to crawl out of the dark ages recently and upgrade our entire computer and internet system: new laptop, new printer, and new wireless, high-speed internet connection. I now know how Dorothy must have felt when she stepped out of her little black-and-white home and into the colorful wonders of Munchkin Land in Oz. The only thing missing was an adorably gruff greeting from the Lollipop Guild.

To celebrate my new ability to upload photos to this site in seconds rather than minutes (you have no idea how much time and frustration I have sacrificed to get these mediocre pictures up for your viewing…um…pleasure?), I thought I’d do a simple upgrade to a recipe. It was time again (again!) to make zucchini bread, so I took it to another level with the addition of cocoa and chocolate chips. Not only have I used up some of those prolific squash, but I’ve brought it into the realm of (modest) celebration with chocolate in the mix. No matter how great my new computer set-up might be, that’s probably as close to multitasking as I’m going to get.


I started with the zucchini buttermilk bread I posted last summer and made a few simple substitutions. The big one was the swap of some of the all-purpose flour for cocoa powder. I really wasn’t sure how much would be prudent here, but I think my (somewhat educated) guess was right, as the bread was plenty chocolaty without getting bitter. I replaced some of the sugar with dark brown sugar to enrich the bread a bit more. In fact, I added a little extra brown sugar to counteract some of the bitterness of the cocoa. I also substituted miniature chocolate chips, which are subtly present as little bursts of chocolate in the final product, for the pecans. As far as the spices go, I kept only the cinnamon, since I like it with chocolate.

Overall, this recipe upgrade was successful. The bread is moist and chocolaty. You can still see the occasional fleck of green zucchini skin, but the zucchini mostly contributes to the moistness of the bread. Okay, at this point you may be asking, as I did: with barely discernable vegetable and clear and present chocolate, how is this now not just cake. This is a good question, and I’ll have to think on that some more, sampling plenty of the product along the way. In the meantime I’ll have to give the answer, “Because I said so.” It’s my upgrade after all.


Chocolate Zucchini Quick Bread

2 ½ cups all-purpose flour
¾ cup cocoa powder
1 ½ teaspoon baking powder
1 ½ teaspoon baking soda
1 teaspoon salt
2 teaspoons cinnamon
3 eggs
1 cup white granulated sugar
¾ cup dark brown sugar
½ cup canola oil or vegetable oil
2/3 cup buttermilk
2 cups shredded zucchini
1 cup miniature chocolate chips


1. Preheat oven to 350 F. In a medium bowl, combine the flour, cocoa, baking powder, baking soda, salt and cinnamon. Stir well with a whisk to combine. Set aside. In a small bowl, combine the sugar and brown sugar. Stir together to combine and break up any lumps of brown sugar. Set aside.

2. Beat the eggs in a large bowl (I use a heavy-duty stand mixer with the paddle attachment at medium speed) about 4 minutes. They will start to get thick and paler in color. Gradually add the sugar mixture and beat until well-blended.

3. Stir in the oil, buttermilk, and zucchini. Gradually add the flour mixture and mix at low speed until just combined. Add the chocolate chips and stir gently with a rubber spatula or wooden spoon, being sure to scrape up any dry ingredients from the bottom of the bowl that may not have been incorporated previously.


4. Grease or spray with cooking spray 2 8 x 4-inch bread pans. Spoon half the batter into each pan.


5. Bake at 350F for 45-50 minutes. When the bread is done, a wooden skewer or pick inserted in the center will come out with just a few crumbs sticking to it, not a glob of wet batter.


6. Cool the bread in the pans on a wire rack for 10 minutes. Remove from the pans and cool completely on a wire rack.

Makes 2 loaves, or at least 20 slices.

Another recipe like this one: Zucchini Buttermilk Bread with Pecans

One year ago: Broccoli and Chickpea Salad with Mustard-Pepper Dressing

Friday, August 27, 2010

Sunday Dessert: Plum Upside-Down Cake


I love reading those articles (and blog posts) in which the author stumbled upon some seasonal bounty, took a load of it home, and made something fabulous. I’m happy to say that I did something similar recently, with these lovely plums. I did, however, keep my homeward haul modest, and of a scale compatible with two people in an apartment eating dessert on Sunday (with leftovers on Monday and Tuesday).


These very small purple plums were labeled “Home Grown” at a local produce market, and I knew I had to at least try them. They looked beautiful, not so ripe that they were leaking, but also not too hard. I controlled myself and brought home a reasonable amount, immediately thinking of dessert. I sampled one as soon as I got home, and their taste was so just right – plenty of real plum flavor, just enough tartness to remind you that it came from nature, and just enough sweet juice – that I began to regret my plans to use them all in a dessert. Cake, however, would make up for that perceived loss.


I had made some kind of plum upside-down cake several years ago. I remember it being good, but making a big mess in the oven, and I don’t seem to have kept the recipe (although that could just have been lack of organization). I had had good luck, however, with the pineapple upside-down cake in Joy of Cooking (I have the 1997 edition). Why couldn’t I just adapt that to use with plums instead of pineapple?


It turns out that there is no reason why I couldn’t do just that. I made a few other modifications to the recipe as well. Inspired by the recipe in The Ultimate Cookbook by Bruce Weinstein and Mark Scarbrough titled “Plum and Rum Barbecue Sauce,” I added a bit of rum to both the brown sugar topping and to the cake batter. Now, I’m a little bit chicken when it comes to boozed-up cakes (or anything else boozed-up for that matter), so I went pretty light on the rum. If you want a rum cake, you’ll have to find a recipe for a rum cake, and let my plum cake be a plum cake. I also replaced the buttermilk (which I didn’t have on hand) in the original recipe with plain yogurt (which I did have). Those two dairy products seem to perform very similarly in baking, and I often use them interchangeably.


Well, the story’s pretty much over now, except to say that the cake was really, really good. It wasn’t boozy at all, but the rum did seem to enhance the flavors and aromas, adding just the slightest caramel note. The yogurt made the cake super-moist, but not mushy, as if it had been underbaked. The plums, of course, were the stars. Sweet and tart and aromatic and fruity just the way only seasonal fruit can be. A scoop of vanilla ice cream on a wedge of warm plum cake…why else does summer even need to exist?


Plum Upside-Down Yogurt Cake
Adapted from Joy of Cooking

You can omit the rum if you wish. Just leave it out of the topping and replace it with yogurt or milk in the egg mixture.

1 pound small plums
3 tablespoons unsalted butter
¾ cup packed dark brown sugar
3 tablespoons rum, divided
2 large eggs
1 teaspoon vanilla extract
1 cup all-purpose flour
¾ cup granulated white sugar
¾ teaspoon baking powder
¼ teaspoon baking soda
¼ teaspoon salt
6 tablespoons unsalted butter at room temperature
1/3 cup plain yogurt

1. Cut the plums in half and remove the pits. If the plums are larger, you might want to slice them so that they can be arranged nicely in the bottom of your baking pan. Set aside.

2. Preheat oven to 350 F. Place the 3 tablespoons butter in a 10-inch cast iron skillet (you could also use a similarly-sized cake pan) and put it in the oven to melt the butter. (You can probably do this while it is preheating.) Once the butter is melted, remove the pan from the oven and brush some of the butter up the sides of the pan.


3. Add the rum and the dark brown sugar to the butter in the pan. Spread the brown sugar evenly over the bottom of the pan. Arrange the halved plums, cut side down on top of the sugar.


4. In a small bowl, beat together the eggs, remaining 2 tablespoons rum, and vanilla extract. Set aside.

5. In a larger bowl or the bowl of a heavy-duty mixer, combine the flour, white sugar, baking powder, baking soda and salt. Mix together briefly with an electric mixer, or with the paddle attachment of a heavy-duty mixer.

6. Add the 6 tablespoons room-temperature butter and the yogurt. Beat at low speed just until all of the flour mixture is moistened, then increase the speed to medium and beat for 1 ½ minutes.

7. Add the egg mixture, one-third at a time, beating at medium speed until the egg mixture is fully incorporated after each addition. Also, scrape the bowl with a rubber spatula before each next egg mixture addition. When the last of the egg mixture has been incorporated, beat for an additional 20 seconds.

8. Spoon or pour the batter over the arranged plums in the pan. Smooth the batter so it is even.


9. Bake at 350 F for about 35 minutes. The cake is done when a wooden pick inserted in the center comes out free of unbaked batter.

10. Tilt the pan around to ensure that the cake is not stuck to the sides of the pan. If it does not seem to be free on all sides, gently slide a knife around the stuck edge to remove it. Set aside on a wire rack for about 5 minutes.

11. While wearing oven mitts or covered with hot pads, place a large plate over the cake. Carefully invert the pan, releasing the cake onto the plate. Gently remove the pan and rearrange any fruit that may be askew on the cake’s top. Cool. The cake can be served warm or completely cooled. Serve with ice cream or whipped cream (or by itself.)

Makes about 8 servings.

Other recipes like this one: Rhubarb Yogurt Cake, Cherry-Plum Crisp

One year ago: Gazpacho

Monday, August 23, 2010

Pasta with Summer Squash, Corn and Bacon

It’s been while since I’ve just given up and thrown what was left of the week’s fresh summer vegetables into an impromptu pasta or stir fry dish (although it looks like stir fry tonight: bok choy, cabbage, beans and broccoli). Therefore, I don’t have summer pasta fatigue just yet. I’m still enthusiastic to try a new vegetable sauté tossed with noodles. Of course, if the recipe also happens to be enhanced with cream and bacon, who can blame me?


The recipe I tried recently was in a stack of yellow summer squash recipes. It was quite simple, which I’m happy to read as “quick and easy” on these hot late summer days. It also promised to be flavorful, if a bit rich, since it was indeed enhanced by the cream and bacon alluded to above. The bounty from our CSA has come to the point, however, where using only one type of vegetable at a time seems a frivolous waste of a meal, not to mention a total bore. Though it made the dish even more yellow, I opted to add juicy kernels of fresh, sweet corn.


It turns out that rotini pasta not only looks good in yellow, but tastes great in yellow, too. You could use other kinds of pasta in this dish, but the point should be to trap the rich, thick sauce and sweet, creamy corn in the twists and folds of the noodle. I was thrilled with the flavor of the corn, which, of course, goes well with bacon and cream, but I was also very pleasantly surprised by the counterpoint its texture makes to the silky cooked squash and floppy pasta. The crisp bacon adds another nice texture, and since the squash and corn are cooked in the rendered bacon fat, its smoky flavor permeates every bite. (If you don’t want to use bacon, skip the bacon steps and sauté the squash and corn in about 2 tablespoons melted butter. More yellow!)

I served this dish with a simple cherry tomato and basil salad and garlic bread. The only thing missing was a great, crisp, well-chilled white wine, which not only would have tasted fabulous, but also would have been yellow. As long as the pasta looked and tasted so good in its matching yellow outfit, it was kind of a shame not to have the perfect coordinating accessory on hand. Even Harry was hoping for wine to go along with this dinner. Note to self: start buying wine by the case!

Pasta with Yellow Squash, Corn and Bacon
Adapted from Martha Stewart Everyday Food magazine

6 ounces short-cut pasta, such as rotini or cavatappi
3 slices thick-cut bacon (or 4 slices of thinner bacon)
1 pound yellow summer squash (about 2 medium squash), quartered lengthwise and sliced
2 ears fresh sweet corn, shucked and silk removed
2 garlic cloves, minced
¼ teaspoon crushed red pepper flakes
½ teaspoon salt
½ cup heavy cream
Chopped fresh parsley for garnish
Freshly grated Parmesan cheese for garnish

1. Cook the pasta in boiling salted water until it is just a little bit more firm than you like to eat it. (It will cook a little bit more later.)

2. Cut the corn kernels from the cobs and set aside.

3. In a large skillet that has a lid (you’ll use the lid later), cook the bacon until it is well browned, turning to cook evenly. Remove from the skillet and set aside on paper towels to drain and cool. Remove all but about 2 tablespoons of the bacon fat from the pan and return it to medium heat.

4. Add the squash, corn, garlic, crushed red pepper flakes and salt. Stir well to combine. Cover and cook about 7 or 8 minutes or until the squash looks softened. Stir occasionally.

5. Uncover and cook 2 to 3 minutes more, or until most of the liquid in the pan has evaporated.

6. Chop the cooked bacon. Stir the bacon, cream, and pasta into the squash mixture. Cook and stir another 2 to 3 minutes or until the cream has thickened. Garnish with the parsley and Parmesan cheese.

Makes about 4 main-dish servings.

Other recipes like this one: Pasta with Kale, Summer Squash, Olives and Feta Cheese, Corn and Green Onion Tart with Bacon, Corn Chowder with Edamame

One year ago: Pasta with Cherry Tomatoes, Olives and Basil

Friday, August 20, 2010

Lazy Salad: Couscous with Nectarine and Chickpeas

Sometimes, the only way I can stand to put together a more complicated dish, especially from a recipe I have not tested before, is to make something, simple, easy, and, frankly, pretty lazy on at least one of the remaining days of the week. If the lazy dish also makes lots of leftovers that keep well in the refrigerator for a few more future lazy days (or too-busy-to-cook days), so much the better.


Enter a couscous salad with nectarines and chickpeas that I’ve been making for about 10 years. It didn’t start out as a lazy-day dish because I was still learning how to cook. It was probably one of, if not the first thing I made starring couscous. It also was a new way to use nectarines, which I’ve always found to be a bit less elusive than peaches. They seem to be both affordable and good more often.


I must keep buying nectarines every week and then forgetting about them, because I keep finding them in the fruit drawer in the refrigerator. I also happened to have some whole wheat couscous for a zucchini dish I never got around to trying (such is the level of my current laziness). It seemed like a good time to revisit this salad.

Couscous, which is a sort of finely ground dried pasta, is pretty much the epitome of totally easy cooking. Literally, if you can boil water you can make couscous come out just right. All you have to do is stir it into your boiling water masterpiece, take it off the heat and leave it alone for five minutes, then sort of fluff it up to separate the grains. The only delay to your gratification is waiting for it to cool if you’re using it for a salad.


Once the oh-so-difficult task of cooking and cooling the couscous has been completed (really you don’t even have to wait until it is completely cool), just stir up a sweetish vinaigrette with lime juice, honey, cumin and coriander and toss it with the couscous, some chickpeas, chopped nectarines and green onions. I also added some fresh mint, but you could add a different fresh herb that you have on hand, or even some fresh spinach or chard. I also think it would be pretty good with some of the nectarines replaced by chopped cucumber. Peaches could stand in for the nectarines, too, if you happen to have those on hand instead.

Nutritionally, this salad is pretty high end for as low on the effort scale as it is. While I used whole wheat couscous, which added some of the benefits of whole grains over refined, you could use regular couscous. I think it is probably easier to find and the salad will taste just as good. The point is to embrace the laziness embodied in this simple, flavorful dish. Goodness knows we’ll be awfully busy tomorrow.


Couscous Salad with Nectarine and Chickpeas
Adapted from Cooking Light magazine, June 2000

1 ¼ cups water
¾ teaspoon coarse (kosher) salt, divided
1 cup uncooked couscous
2 tablespoon lime juice
2 tablespoon olive oil
1 tablespoon honey
½ teaspoon ground cumin
½ teaspoon ground coriander
3 medium nectarines, chopped (about 1-inch cubes)
¼ cup chopped fresh mint
¼ cup chopped green onions
1 (15 ½ oz.) can chickpeas (garbanzo beans), drained and rinsed

1. Bring water to a boil in a medium saucepan. Add ¼ teaspoon salt and slowly stir in the couscous. Remove from the heat. Cover and let stand 5 minutes. Fluff gently with a spoon or fork to separate the grains. Set aside to cool.

2. In a small bowl, combine the lime juice, olive oil, honey, cumin, coriander and remaining ½ teaspoon salt. Whisk until well-combined. Set aside.

3. In a large bowl, combine the couscous, nectarines, mint, green onions and chickpeas. Pour the lime juice mixture over the top and stir to combine well. Chill until ready to serve.

Makes about 6 1-cup servings.

Other recipes like this one: Wheat Berry Salad with Sugar Snap Peas and Lemon Vinaigrette, Three Grain Salad with White Beans and Artichokes

One year ago: Summer Squash Casserole with Basil and Onion


Wednesday, August 18, 2010

A Break in the Weather: Potato-Tomato Gratin

I was thrilled a few days ago when the hot and humid weather decided to go bother someone else and left us with some highs in the mid-70s. I am not what you could call a lover of the heat, and the cooler weather gives me some hope that the world might not be such a terrible place. And I can make something in the oven without feeling like the apartment is going to combust at any moment.


I used one of my blessedly cool afternoons to try out a recipe based on this one from the excellent blog 101 Cookbooks. It’s a gratin of tomatoes and potatoes with caramelized onions and flavorful spices. I’ve had the ingredients to makes this dish, or at least ingredients I thought would probably work, for some time. While the inspiration recipe (which you should check out…the photos are better) called for sliced tomatoes and Yukon gold potatoes, I happened to have lots of cherry tomatoes (some from the CSA and some from my patio garden), and purple potatoes (yes, they’re purple on the inside, too.)


I also had plenty of onions that had overstayed their welcome to use in the caramelized onion layer. I’m probably the last person who should be writing instructions on making caramelized onions. If you were to ask me, I would probably say, “I dunno, just cook them until they get all brown and soft.” Really, I think the key is to cook the onions low and slow and allow for different onions to perform differently based on their moisture and sugar content. Yellow onions seem to make the nicest brown and sweet caramelized onions. I cover the pan for the longest portion of the onion-cooking process so they sort of stew in their own juices, and then, when they look like they’re almost done, I remove the lid and let any remaining liquids boil away allowing the onions to get a little browner and just a little bit sticky. It’s pretty simple, but does take some time. That time, however, is totally worth it. A dish like this one is significantly enhanced by caramelized onions.

It is also enhanced by fresh ingredients and well-chosen spices. I used cumin and coriander to pep up my gratin, along with some slow-burning hot red pepper flakes. All of those flavors worked and played well with the sweet-tart cherry tomatoes and earthy potatoes. Since I flavored the cream with the spices and the cream was slurped up by everything in the dish, there was a good balance of seasoning throughout.


I’m more excited about this recipe than I have been about any new recipes for some time, and I don’t think it’s just because I’m excited about the break in the hot weather that allowed it to be made and enjoyed in more comfort. The juicy tomatoes lend some of their perky acidity to the cream and potatoes, and the caramelized onions add a brilliant sweetness. The smoky spices balance the sweetness and the potatoes, which are also pretty in their exotic purpleness, ground everything and hold it all together. I may just start making this dish even when it’s too hot for the oven. Well, let’s not get too crazy just yet.


Spicy Potato and Tomato Gratin with Caramelized Onions
Based on a recipe from the blog 101 Cookbooks

2 teaspoons ground cumin
2 teaspoons ground coriander seeds
½ teaspoon crushed red pepper flakes
3 tablespoons olive oil, divided
1 pound yellow or white onions, thinly sliced
1½ teaspoon coarse (kosher) salt, divided
¾ pounds potatoes, thinly sliced (about 1/8 inch thick)
½ cup heavy cream
1 pound cherry tomatoes, cut in half
1 cup whole wheat breadcrumbs, preferably fresh

1. Combine the cumin, coriander and red pepper flakes in a small bowl. Set aside.

2. To cook the onions, heat 2 tablespoons of the olive oil in a large skillet with a lid over medium heat. Add the onions and ½ teaspoon salt. Cook, stirring often for about 5 minutes or until beginning to brown. Cover, reduce heat to low, and cook about 20 minutes or until the onions are very soft and very brown. (You can prepare the remaining ingredients while this is going on.) Lift the lid to stir occasionally.

3. Remove the lid and continue cooking until most of the liquid has evaporated, 5 to 10 minutes, stirring occasionally. Remove from the heat. Stir in half of the cumin mixture and set aside.

4. Preheat the oven to 350 F. In a medium sized bowl, combine the sliced potatoes, cream, remaining 1 teaspoon salt and remaining cumin mixture. Stir to coat the potatoes.

5. Spread half of the cooked onions in the bottom of a 2 quart (or similar size) casserole dish. Layer half of the potatoes over the onions (your clean hands are the best tool for this job). Layer half of the tomatoes over the potatoes.


6. Scoop up a few tablespoons of the cream in the potato mixture and pour it over the tomato layer. Spread the remaining onions over the tomato layer, then the remaining potatoes over the onions. Press down on the potatoes to squash the layers together. Finish with a layer of the remaining tomatoes. Pour the remaining cream mixture evenly over the top.

7. Cover the dish and bake at 350 F for 1 hour. Remove the cover and bake for about 25 minutes more. Check to make sure the potatoes are nice and tender before proceeding to the next step.

8. Combine the breadcrumbs and the remaining 1 tablespoon olive oil in a small bowl. Stir together until the crumbs are well moistened with the oil. Spread the breadcrumb mixture over the top of the dish. Bake an additional 10 to 15 minutes at 350 F or until the breadcrumb layer is brown and crunchy. Remove from the oven and let cool on a wire rack 10 minutes before serving.

Makes about 4-6 servings.

Other recipes like this one: Potatoes Anna with Hidden Beets, Potato and Celeriac Casserole with Baked Eggs

One year ago: Cold Cucumber Soup


Friday, August 13, 2010

Brownie Ice Cream Cake

It recently was my birthday. (I turned 29 yet again, if you must ask.) Harry’s birthday is just a few days after mine, so I usually make him the standard birthday cake (this year it was a classic yellow cake with chocolate buttercream frosting), and I make some other kind of dessert for my birthday. Since it’s usually just the two of us indulging in these birthday treats, I try to make the earlier one either something we can eat all of very quickly (fat chance*), or something freezable that we can enjoy over the next few weeks.

This year, I considered an ice cream cake for my birthday. It’s festive yet freezable, and definitely decadent enough for a celebration. I was perusing my copy of Ben & Jerry’s Homemade Ice Cream & Dessert Book and saw that these geniuses used brownies instead of cake in their ice cream cake recipe. I’d made a layered ice cream cake with actual cake before, and while it was fine, I thought a brownie layer would be brilliant. It all came together like sweet serendipity when I read the notes accompanying a brownie recipe in The Ultimate Brownie Book by Bruce Weinstein and Mark Scarbrough: “They’re also good right out of the freezer: cold, chewy, and very chocolaty.” This layered ice cream treat was frozen, rich, chocolate destiny.


I baked the brownies (an 8” square batch), made hot fudge sauce and vanilla ice cream and layered them along with crumbled Oreo cookies. I used an 8-inch bread pan lined with plastic wrap as a mold. The brownies were a little crumbly and broke into fourths after I cut them in half, but that seemed to make no difference in the final product. The fudge sauce was too thick (mmmmm…thick, rich fudge sauce) to spread or dollop over the softened ice cream, so I spread it on the brownies. The fudge sauce I used (homemade and based on the recipe in the Ben and Jerry’s book…see below for my version) sets up like a soft ganache when cooled, so it makes a soft and chewy and intensely chocolaty layer in the dessert. Since the ice cream needs to be pretty soft and melty to spread, it also kind of squished out the sides of the layers and ended up coating the outside like frosting on a cake. I can’t say this was intended, and this may not happen if your ice cream isn’t as soft as mine was, but I will say that I liked it.

While I went all out and made most of the main ingredients from scratch for this treat, you could use store-bought ice cream, fudge sauce and brownies, or make brownies from your favorite boxed mix. I’ve included the recipes I used for the brownies and the fudge sauce below. They’re both very good on their own or in other applications as well. I can imagine many other ingredients and flavors that could be enjoyed using this method, such as mint chocolate chip ice cream instead of vanilla, pecans and caramel instead of chocolate sandwich cookies, or blondies in place of the brownie layer with butter pecan ice cream and butterscotch sauce. I think I may just have to start having more birthdays!


*Any and all perceived puns on this site are fully intended unless otherwise noted by the author

Hot Fudge Sauce
Adapted from Ben &Jerry’s Homemade Ice Cream & Dessert Book by Ben Cohen and Jerry Greenfield with Nancy J. Stevens

2 ounces unsweetened chocolate
¼ cup (½ stick) unsalted butter
¼ cup plus 2 tablespoons unsweetened cocoa powder
1 cup sugar
½ cup heavy cream

1. In a medium saucepan, melt the chocolate and butter over low heat, stirring frequently. Be very careful not to burn the chocolate.


2. When the chocolate and butter are completely melted and smooth, add the cocoa powder. Whisk until the cocoa is completely incorporated and no dry cocoa is visible.

3. Stir in the sugar a little at a time. When the sugar is fully incorporated, the mixture will have the consistency of wet sand.


4. Slowly stir in the cream. Cook over low heat stirring frequently until the sugar has all dissolved and the sauce is smooth and glossy, about 20-30 minutes.


Makes about 1 ½ cups.

Serve warm over ice cream, etc. or chill until ready to use. Warm and stir before using if chilled.


BrowniesAdapted from a recipe in The Ultimate Brownie Book by Bruce Weinstein and Mark Scarbrough

The instant coffee powder I added to these brownies just darkens the flavor a bit more and gives them some mocha character. It is optional.
½ cup all-purpose flour
¼ cup plus two tablespoons unsweetened cocoa powder
¼ teaspoon baking powder
¼ teaspoon salt
2 teaspoons instant coffee powder (optional)
½ cup (¼ pound or 1 stick) unsalted butter at room temperature
1 cup sugar
2 large eggs
1 teaspoon vanilla extract

1. Preheat oven to 350 F. Fit a piece of parchment paper to cover the bottom and sides of an 8-inch square baking pan. Spray the parchment with cooking spray. (This will enable you to remove the entire pan of brownies in one piece after they have baked and cooled. If you just want to eat these brownies and don’t mind cutting them out of the pan one at a time, you could just grease the pan well.)

2. In a medium-size bowl, combine the flour, cocoa powder, baking powder and salt. Whisk together until well-combined and there are now lumps. (Alternatively, you could sift this mixture together.) Set aside.

3. In the bowl of a heavy-duty mixture, combine the butter and sugar. Beat at medium speed until very fluffy and pale in color. (You could also use a large bowl and a hand-held mixer to do this.)

4. Add the eggs one at a time and beat well to incorporate fully after each addition. Beat for about one minute more after the second egg has been added and then beat in the vanilla extract.

5. Slowly stir in the flour mixture until just a few bits of dry ingredients are visible. With a spoon or rubber spatula, gently stir the batter until all the dry ingredients are just moistened.

6. Spoon the batter into the prepared baking pan and smooth the top. Bake at 350 F for 25 to 27 minutes or until a wooden pick inserted in the middle comes out without any wet batter clinging to it. Cool completely on a wire rack. Remove the whole thing from the pan by pulling up by the parchment paper. Cut as desired.


Makes 8-10 servings or enough brownie for 1 8-inch by 4-inch layered ice cream brownie dessert.

Layered Brownie Ice Cream Dessert
1 heaping cup chopped chocolate sandwich cookies (such as Oreos), divided
2 cups vanilla ice cream, softened, divided
1 8-inch square recipe Brownies (such as the recipe above), cut in half
¾ cup cooled Hot Fudge Sauce (such as the recipe above), divided

1. Line an 8-inch by 4-inch bread pan (or other container of similar size) with plastic wrap with enough hanging over the edges to wrap completely over the top.

2. Place half of the chopped cookies into the bottom of the lined pan in an even layer. Spread half of the ice cream over the top of the cookies.

3. Spread ¼ cup of the fudge sauce on one side of one half of the brownie. Place it fudge side down on top of the ice cream. Spread ¼ cup fudge sauce on the other side of the brownie. Layer the remaining half of the cookies over the brownie.


4. Spread the remaining ice cream over the cookies. Spread the remaining fudge sauce on one side of the remaining brownie half. Place the brownie, fudge side down on the ice cream. Wrap the over-hanging ends of the plastic wrap over the top of the last brownie layer.

5. Freeze the layered dessert for several hours. To remove from the pan, you may need to soak the bottom of the pan for a few moments in warm water. Unwrap the plastic wrap and invert the pan over a plate and release the cake. Remove the remaining plastic wrap. Slice with a serrated knife warmed with warm water to serve.

Makes about 10 servings. Re-wrap leftovers and keep frozen, preferably in a zip-top freezer bag or other freezer-safe container.

Another recipe like this one: Rich Chocolate Ice Cream

Wednesday, August 11, 2010

Pasta with Cherry Tomatoes and Chickpea Sauce

It seems like every year I plant a little too much of something in my humble little container garden on and around my back patio. Last year (as well as the year before) it was basil. I backed off of that this year, since I also get quite a bit from the CSA and have reached the point where I can only eat so much Pesto. Instead, this year I went totally crazy for cherry tomatoes.


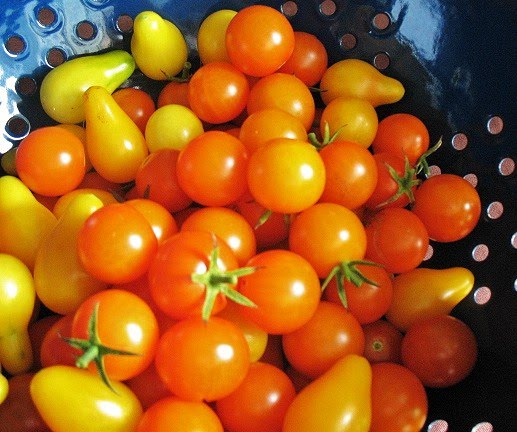
I planted Sungold cherry tomato plants that I bought at the Featherstone Farm open house event and also Yellow Pear tomatoes that I have had good luck with in the past. I had some idea that the Sungolds would be prolific, but I’ve been pleasantly surprised with the sheer numbers of little, sweet, juicy, orange beauties I’ve been harvesting.

Often, having cherry tomato plants on one’s porch means going out and picking a few to munch out of hand. Maybe you need to wipe them off a bit before popping them in your mouth, but you can savor each and every juicy jewel before you even get back into the house. Not so with my crop this year. No handfuls but bowlfuls. And more than enough for dishes like Pasta with Cherry Tomatoes, Basil and Olives, as well as another favorite, Pasta with Cherry Tomatoes in a Garlicky Chickpea Sauce.


The chickpea sauce for this dish is much like a thin hummus. It has a little spice, a splash of lemon juice, and lots of garlic. First the chickpeas are simmered in chicken broth with a couple cloves of crushed garlic. They’re then pureed, mixed with more sharp, raw, minced garlic and the lemon juice. Just toss that thick sauce with hot pasta and, of course, lots of cherry tomatoes. The tangy lemon juice compliments the sweet-tart cherry tomatoes, and the heat of the sauce mellows the raw garlic just enough. You still know it’s there, and you might just bite into a piece, which then dominates the flavor, but that’s what being a garlic lover is all about.


I tried using an immersion blender to puree this sauce, but I could get the chickpeas and crushed garlic smoother if I used a regular blender. The dish is so easy that the hardest thing will be cleaning the blender anyway. I pulled out the little insert in the blender lid and held a towel over the opening while blending. This helps to keep the hot blender contents from explosively steaming their way out of the blender jar as they may with a sealed lid. I think that little piece comes out of the lid just for such an occasion, but I could be completely wrong.

I love tomatoes of all kinds, so it’s been especially gratifying to grow so many of them myself, and you can’t get much more fresh than “just picked from the plant next to the patio door.” You may say my plants look like they getting a little out of hand. That may be so, but I defend my right to grow as many cherry tomatoes as I can eat. Besides, the little bunnies I recently discovered taking shelter under the over-reaching boughs of my Sungolds seemed quite happy with the situation as it stands.


Pasta with Cherry Tomatoes and Garlicky Chickpea Sauce
Based on recipe in Cooking Light magazine.

You can cook the pasta while preparing the other ingredients. I prefer pasta shapes that can trap sauces and cup the cherry tomatoes for this dish.

6 ounces (uncooked weight) short-cut pasta (I used campanelle, but shells or orichette would be good, too), cooked as desired and kept hot
4 cloves garlic, divided
1 tablespoon olive oil
¾ teaspoon coarse salt (kosher salt)
¼ teaspoon crushed red pepper flakes
1 (15.5 ounce) can chickpeas, drained and rinsed
1 cup chicken broth (I use fat-free reduced sodium)
2 cups cherry tomatoes, any variety, cut in half
2 tablespoons fresh lemon juice
Chopped fresh parsley and freshly grated Parmigiano-Reggiano cheese for garnish

1. Finely mince two of the garlic cloves and set aside. Crush the remaining two garlic cloves with the flat of a knife.


2. Heat the oil in a medium-size saucepan over medium heat. Add the crushed garlic and sauté 30-seconds to 1 minute, or just until the garlic is beginning to soften. If it starts to brown, move on to the next step.

3. Add the salt, crushed red pepper flakes, chickpeas, and chicken broth. Bring to a boil, cover, reduce heat and boil gently for 15 minutes.


4. Spoon the chickpea mixture into a blender. Remove the insert in the lid. Replace the lid and cover the hole with a folded towel. Holding the lid down with the towel, blend the mixture until smooth.

5. Add the minced garlic and lemon juice to the pureed chickpea mixture. Combine the cooked, hot pasta, cherry tomatoes and chickpea sauce. Toss gently to coat. Garnish with parsley and plenty of Parmesan cheese.

Makes about 4 main dish servings.

Other recipes like this one: Pasta with Cherry Tomatoes, Basil and Olives, Italian Chickpeas